
Vibration/Magnet Sensor Quickstart Guide
Please set up and register this device FIRST!
In order to receive alerts, the Hub must be used in conjunction with a Sensor (sold separately) and the Skyhawk CE smartphone app.
Hub
Kiwi
Sensors
Software/App
Device Overview
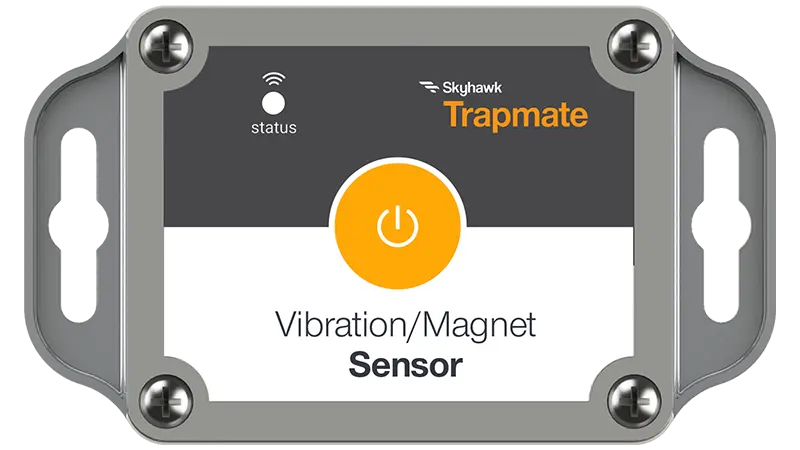
The Trapmate Vibration/Magnet Sensor attaches to traps and stations and sends alerts to the Skyhawk CE and enterprise apps via the Trapmate Hub.
To detect vibrations, attach the sensor to the trap or station either directly or via an object attached to the trap or station.
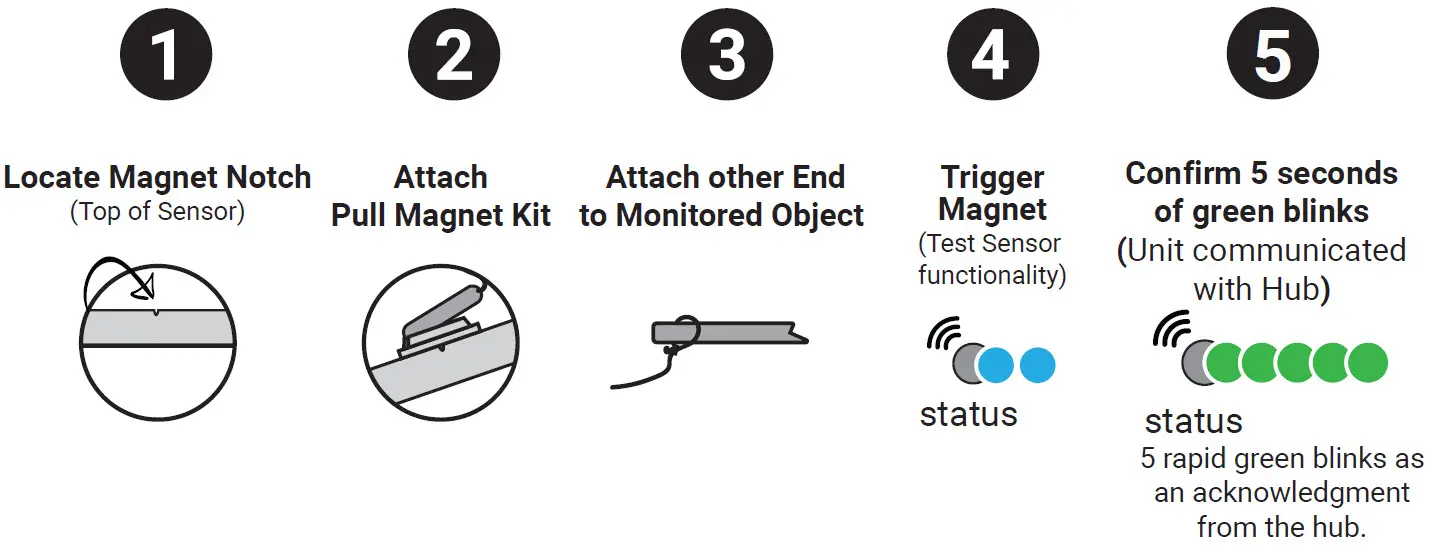
The magnet sensor detects when a magnet is pulled away from the body of the sensor. You can use Trapmate adapters and connectors to attach the magnet to a moving part of a trap or cage or station.
The sensor settings can be adjusted for sensitivity to adjust for the location conditions in which the sensor is installed, e.g., a windy area or an area near forklift traffic.
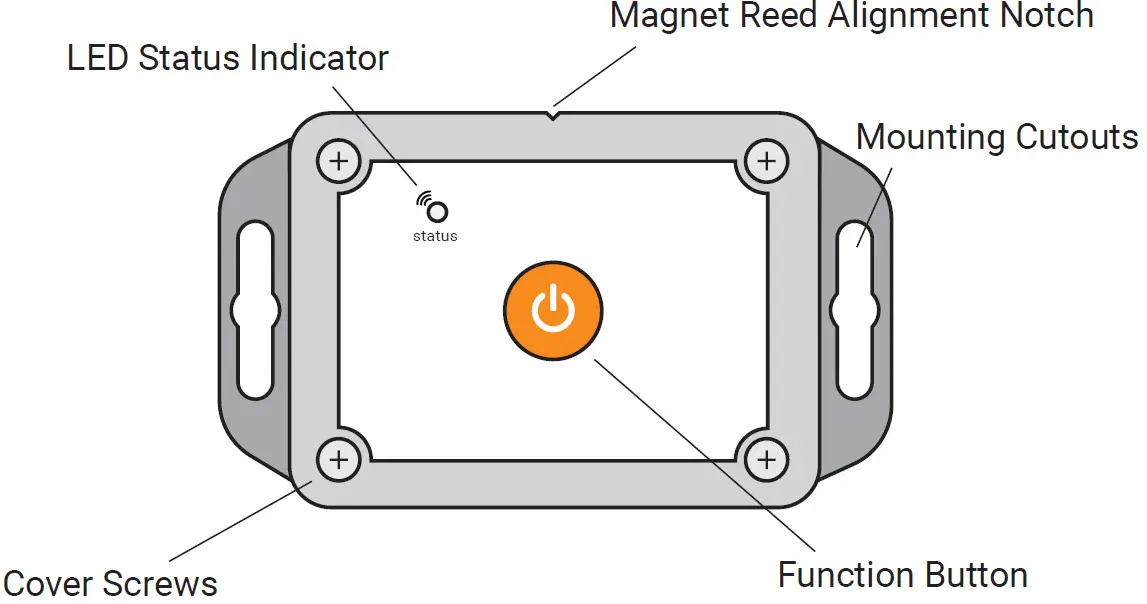
The guide below provides information on how to set up your adapter, adjust its settings, and understand its status from the LED indicator.
Device Status Lights
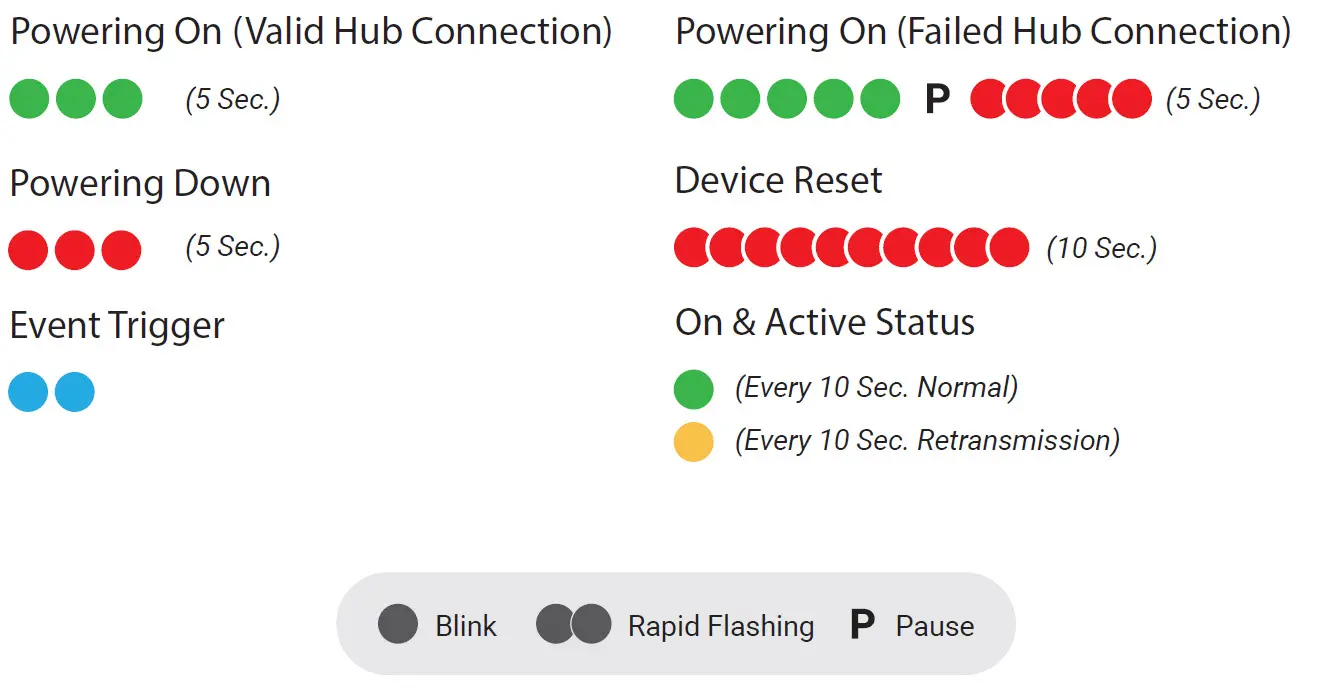
NOTE: If the Sensor is out of range or the Hub unit was not turned on, the status LED on the Sensor will start rapidly blinking red after power up. Make sure the Hub unit was turned ON first, or try relocating the Sensor/Hub combination, so they are closer to each other. Power cycle or reset Sensor to retry Hub unit connectivity validation. (For further troubleshooting, refer to Installation & User Manual)
Activate Sensor
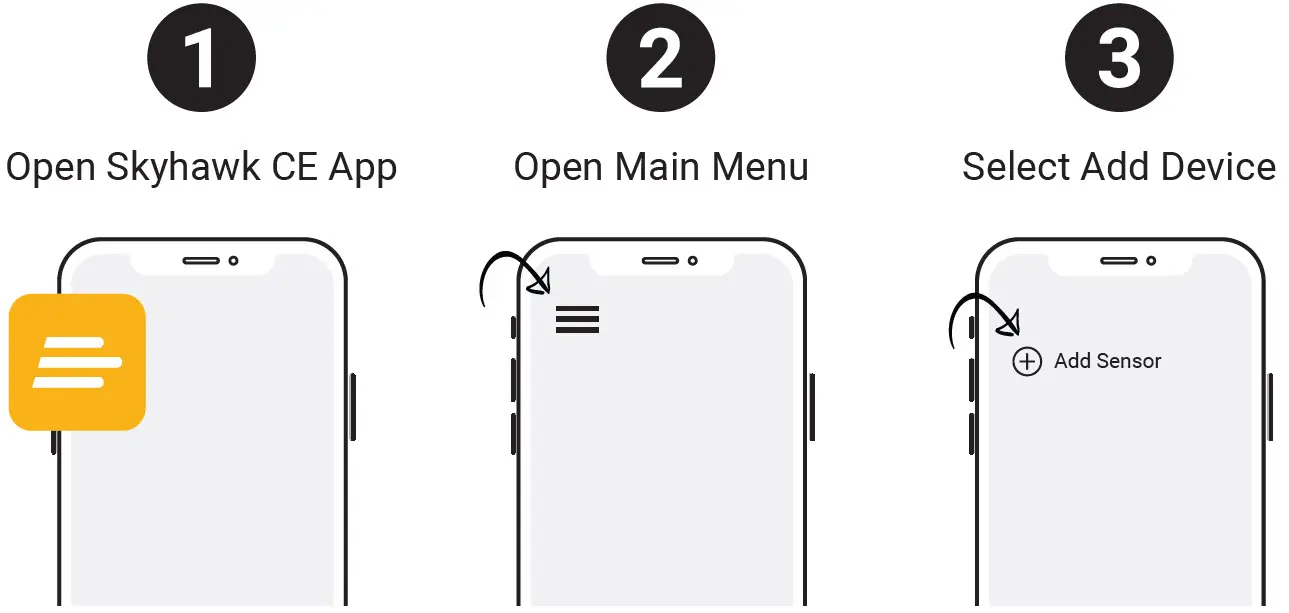
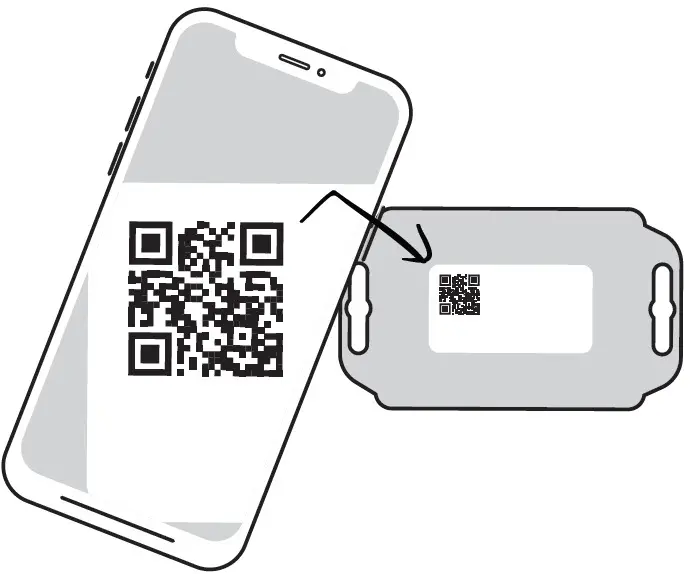
Scan the unique QR code located on the back of the device and follow all in-app instructions to finish activating your sensor.
Product Serial Number can be entered manually if QR code can not be read.
NOTE: QR code and serial number can also be found on the original packaging.
Start-Up Operation
IMPORTANT: Hub unit needs to be ON and in range, for Sensor connectivity.
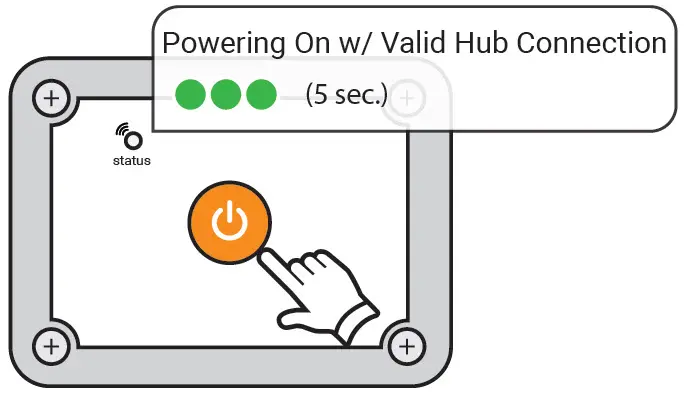
Step 1: Press and release the power/function button; the status light blinks green.
Step 2:Once powered on, the Sensor will automatically send an ON alert to your Hub; then after about a 5 second pause the status light will rapid blink green to confirm a valid connection.
Step 3: Minimum required signal strength from sensors for reliable operation is approximately 106dB.
NOTE: If the Sensor is out of range or the Hub unit was not turned on, the status LED on the Sensor will start rapidly blinking red after power up. Make sure the Hub unit was turned ON first, or try relocating the Sensor/Hub combination, so they are closer to each other. Power cycle or reset Sensor to retry Hub unit connectivity validation. (For further troubleshooting, refer to Installation & User Manual)
Adjust Accelerometer Sensitivity
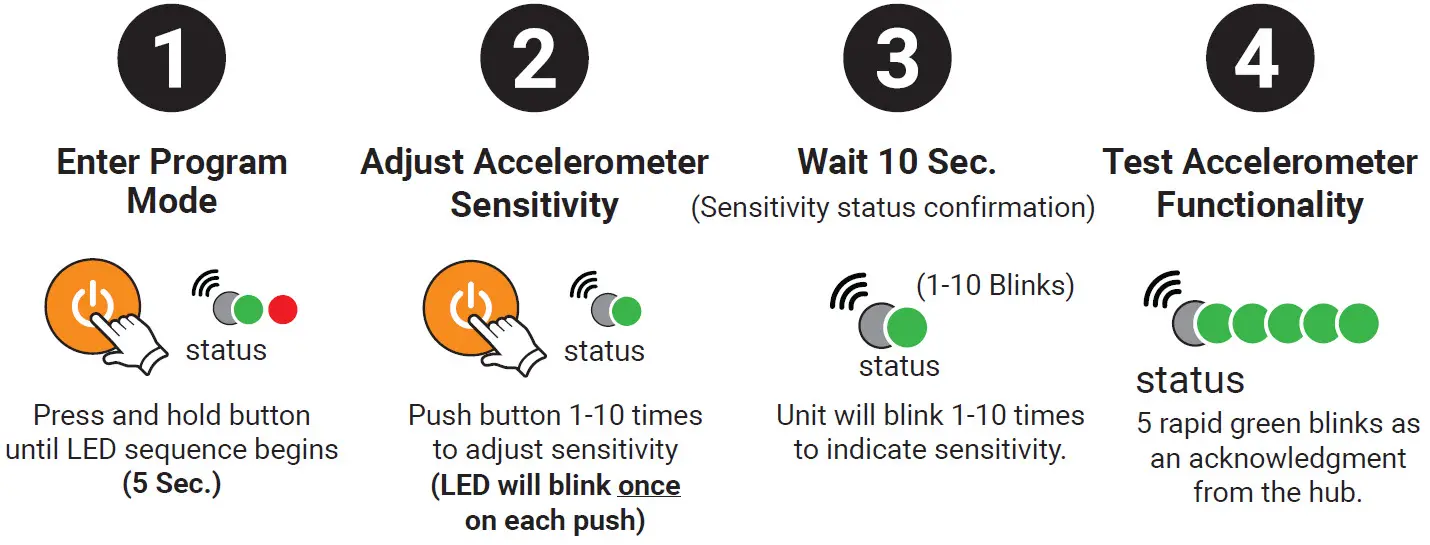
IMPORTANT: Sensor must be turned on to enter program mode.
Sensitivity
1 (Least Sensitive) > 10 (Most Sensitive) Default set at 7
Trigger Type Setup
Accelerometer (By Default)
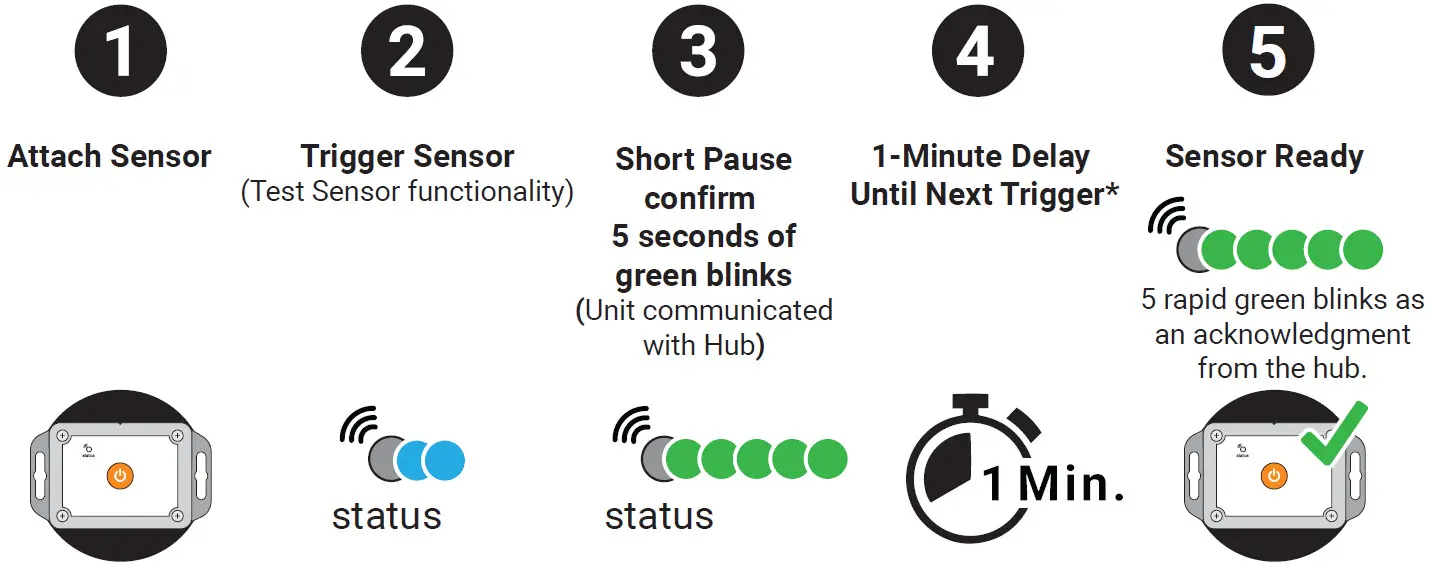
* One minute trigger is only for the 1st through 5th trigger. The 6th trigger and after is a one hour backoff. The timer resets if the unit’s heartbeat goes out, power cycled, or a reed trigger will set it back.
Enable/Disable Accelerometer
Magnet Reed Switch (Optional item, purchased separately)
Enable/Disable Accelerometer
IMPORTANT: Remove batteries prior to changing jumper configuration.
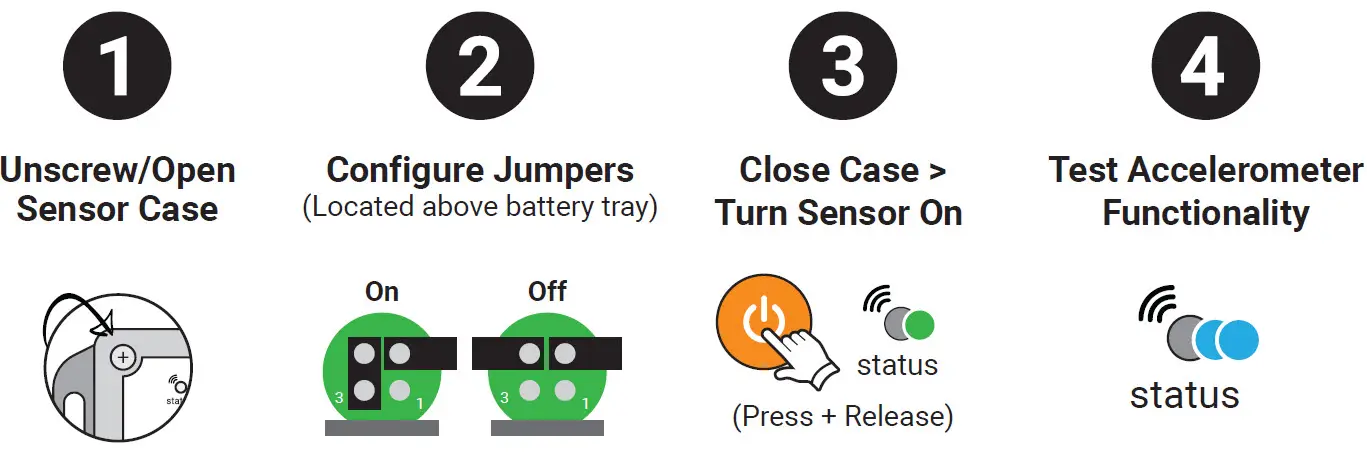
Your content goes here. Edit or remove this text inline or in the module Content settings. You can also style every aspect of this content in the module Design settings, and even apply custom CSS to this text in the module Advanced settings.
See Installation & User Manual for detailed instructions.
Shutdown Operation
If the Sensor is not going to be used for an extended period of time:
Step 1: Press and release the power/function button; the status light starts blinking red.
Step 2: Sensor will continue to blink red 5 times during shutdown.
NOTE: If Hub unit is in range during the shut down process, the Sensor will send a power-down alert to your Skyhawk CE App.

Resetting Sensor
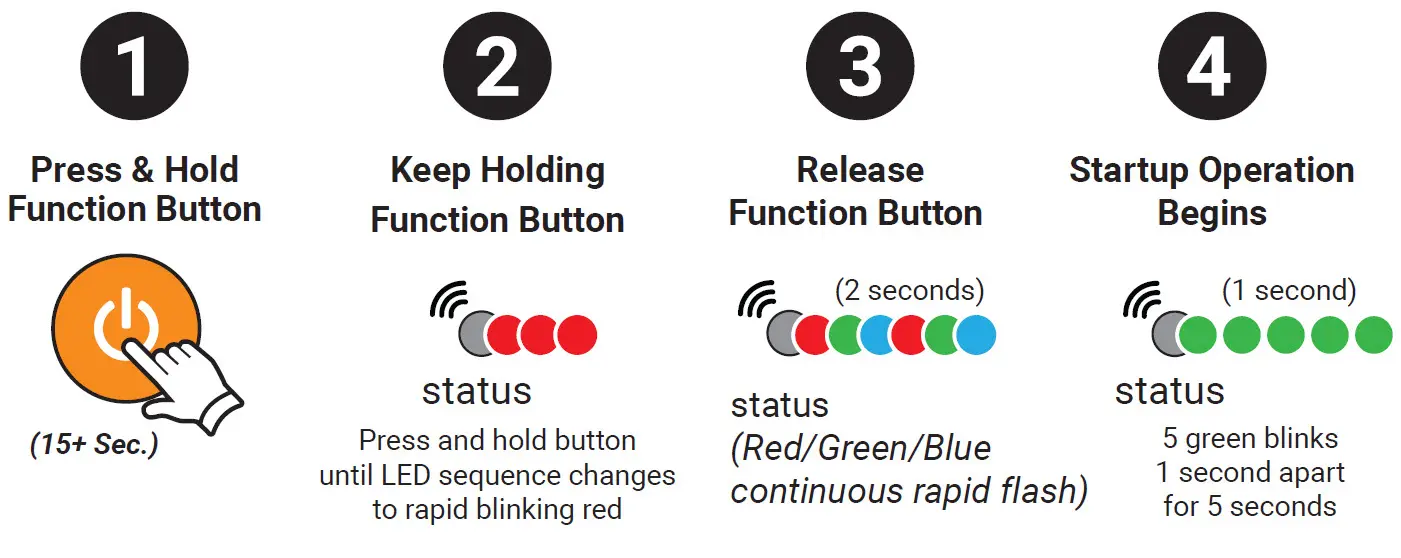
NOTE: While holding the function button, the status light sequence will pass though the sensitivity menu in which the status light will start blinking green/red. Continue to hold past this until the status light is only rapidly blinking red.
Battery Replacement
IMPORTANT: Always replace batteries with 2 new and identical name-brand AA alkaline batteries. If jumpers have been modified, removing and replacing batteries will update unit to new settings.
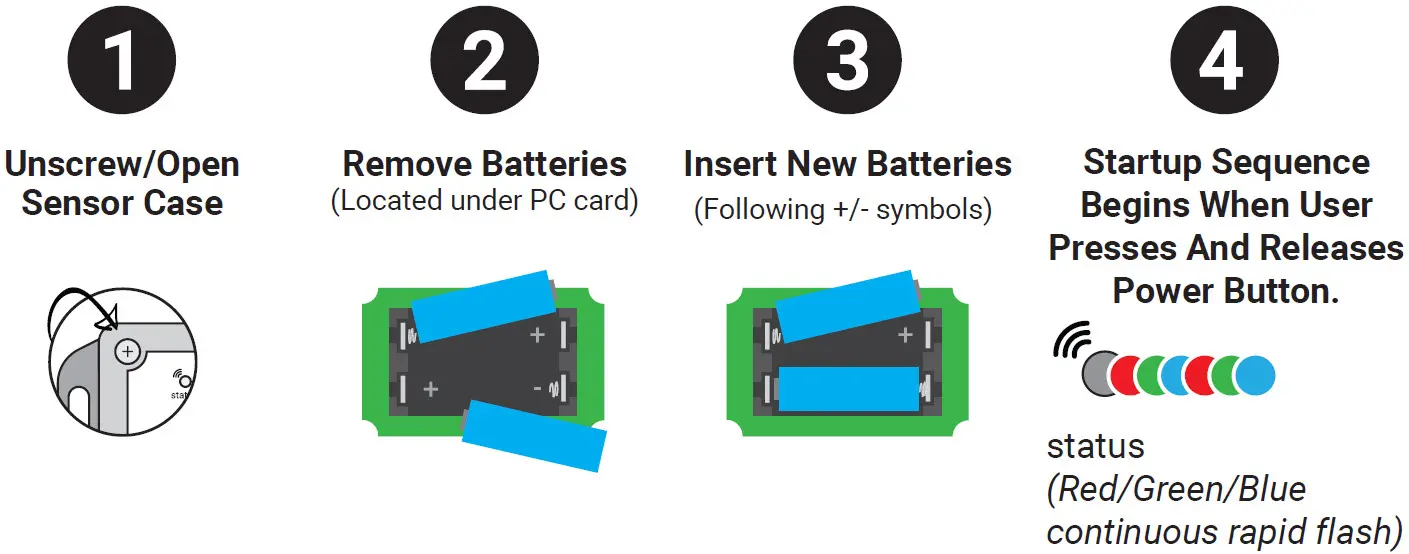
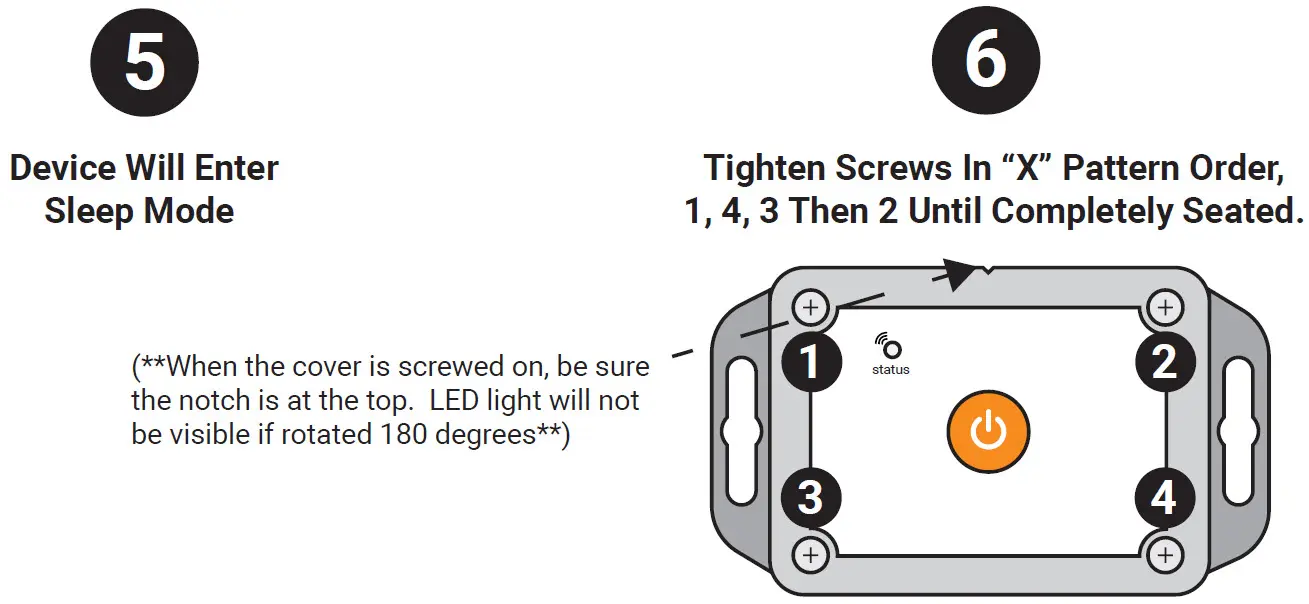
Battery Optimization
While transporting or not actively using the Sensor in a deployment, it is recommended to power down the device to prevent unwanted and excessive triggering. Accelerometer will activate due to vibration in transport and battery life will shorten considerably.
If not using the Sensor for more than 1–2 days, it is recommended to turn the device off. Store unit in a dry place when not in use.
Limited Product Warranty
THIS LIMITED WARRANTY FOR SKYHAWK PRODUCTS GIVES YOU SPECIFIC LEGAL RIGHTS AND YOU MAY ALSO HAVE OTHER RIGHTS, WHICH VARY BY STATE, PROVINCE, OR JURISDICTION.
THIS LIMITED WARRANTY CAN BE FOUND ONLINE AT WWW.SKY-HAWK.COM/LEGAL AND IN THE DOCUMENTATION WE PROVIDE WITH OUR PRODUCTS.
COMPANY WARRANTS THAT DURING THE WARRANTY PERIOD, THE PRODUCT WILL BE FREE FROM DEFECTS IN MATERIALS AND WORKMANSHIP.
COMPANY EXPRESSLY LIMITS THE DURATION AND REMEDIES OF ALL IMPLIED WARRANTIES, INCLUDING WITHOUT LIMITATION THE WARRANTIES OF MERCHANTABILITY AND FITNESS FOR A PARTICULAR PURPOSE TO THE DURATION OF THIS EXPRESS LIMITED WARRANTY.
SOME STATES DO NOT ALLOW LIMITATIONS ON HOW LONG AN IMPLIED WARRANTY LASTS, SO THE ABOVE LIMITATION MAY NOT APPLY TO YOU.
OUR RESPONSIBILITY FOR DEFECTIVE SKYHAWK PRODUCTS IS LIMITED TO REPAIR, REPLACEMENT OR REFUND AS DESCRIBED BELOW IN THIS WARRANTY STATEMENT.
Who May Use the Limited Product Warranty?
This limited warranty extends only to the original purchaser of the Skyhawk Product from the Skyhawk Website or from an authorized Skyhawk Dealer, or to the first person who activates the Skyhawk Product through registration of the Product to their Skyhawk Account (“you“/ “your”). It does not extend to any subsequent owner or other transferee of the Product.
What Does the Limited Product Warranty Cover?
This limited warranty covers defects in materials and workmanship of the Product for the Warranty Period as defined below.
What Does the Limited Product Warranty NOT Cover?
THIS LIMITED WARRANTY DOES NOT APPLY, AND IS VOID AND WITHOUT EFFECT AND COMPANY SHALL HAVE NO LIABILITY WHATSOEVER FOR DEFECTS OF SUCH PRODUCT, WHERE:
The Product has been subjected to abuse, misuse, neglect, negligence, accident, improper testing, improper installation, improper storage, improper handling, abnormal physical stress, abnormal environmental conditions, or use contrary to Seller’s installation and maintenance instructions, restrictions on use and/or Important Safety Precautions.
The Product has been reconstructed, repaired, or altered by Persons other than Seller or its authorized Representative; or the Product serial number is missing, or the anti-tampering seal or other anti-tampering device has been broken.
What Is The Period Of Coverage for the Limited Product Warranty?
This limited warranty starts on the original date of purchase and lasts for ONE (1) YEAR (the “Warranty Period“). The Warranty Period is not extended if we repair or replace the Product. We may change the availability of this limited product warranty at our discretion, but any changes will not be retroactive.
What Are Your Remedies Under the Limited Product Warranty?
With respect to any defective Product during the Warranty Period, Company will, in its sole discretion, repair or replace such Product free of charge (including shipping and handling fees to return the repaired or replacement Product to you) or refund the price paid (including any shipping or handling fees).
How Do You Obtain Warranty Service?
To obtain warranty service, you must, during the Warranty Period, first contact Customer Support to notify Company of any defect or failure of the Product and obtain a Return Merchandise Authorization (“RMA“) number. No warranty service will be provided without an RMA number. You may, at our discretion, be required to return the Product or destroy the Product and provide proof of destruction. When required to return the Product, you will be provided with shipping instructions and proof of purchase must accompany shipment. Company shall pay for shipping and handling charges in connection with performance of this limited warranty provided that Product is returned by following the shipping instructions provided under authorized RMA along with valid proof of purchase. For additional RMA process details go to www.sky-hawk.com.
Limitation of Liability for Breach of Limited Product Warranty
THE REMEDIES DESCRIBED ABOVE ARE YOUR SOLE AND EXCLUSIVE REMEDIES AND COMPANY’S ENTIRE LIABILITY FOR ANY BREACH OF THIS LIMITED PRODUCT WARRANTY. COMPANY’S LIABILITY SHALL UNDER NO CIRCUMSTANCES EXCEED THE ACTUAL AMOUNT PAID BY YOU FOR THE PRODUCT, NOR SHALL COMPANY UNDER ANY CIRCUMSTANCES BE LIABLE FOR ANY CONSEQUENTIAL, INCIDENTAL, SPECIAL OR PUNITIVE DAMAGES OR LOSSES TO ANY PERSON OR PROPERTY ARISING OUT OF THE USE OR INABILITY TO USE THE PRODUCT INCLUDING, BUT NOT LIMITED TO, PERSONAL INJURY, WRONGFUL DEATH, PROPERTY DAMAGE, LOSS OF DATA, LOSS OF REVENUE OR PROFITS, BUSINESS INJURY, BUSINESS INTERRUPTION OR ANY OTHER DIRECT OR INDIRECT DAMAGES, EVEN IF COMPANY HAS BEEN ADVISED OF THE POSSIBILITY OF SUCH DAMAGES.
SOME STATES DO NOT ALLOW THE EXCLUSION OR LIMITATION OF INCIDENTAL OR CONSEQUENTIAL DAMAGES, SO THE ABOVE LIMITATION OR EXCLUSION MAY NOT APPLY TO YOU.
THE TERMS OF THIS LIMITED WARRANTY FOR SKYHAWK PRODUCTS WILL APPLY TO THE EXTENT PERMITTED BY APPLICABLE LAW. FOR A FULLDESCRIPTION OF YOUR LEGAL RIGHTS YOU SHOULD REFER TO THE LAWS APPLICABLE IN YOUR JURISDICTION.
Regulatory Information
This device complies with part 15 of the FCC Rules. Operation is subject to the following two conditions:
(1) This device may not cause harmful interference, and
(2) this device must accept any interference received, including interference that may cause undesired operation
These limits are designed to provide reasonable protection against harmful interference in a residential installation. This equipment generates, uses and can radiate radio frequency energy and, if not installed and used in accordance with the instructions, may cause harmful interference to radio communications. However, there is no guarantee that interference will not occur in a particular installation. If this equipment does cause harmful interference to radio or television reception, which can be determined by turning the equipment off and on, the user is encouraged to try to correct the interference by one or more of the following measures:
– Reorient or relocate the receiving antenna.
– Increase the separation between the equipment and the receiver.
– Connect the equipment into an outlet on a circuit different from that to which the receiver is connected.
– Consult the dealer or an experienced radio/TV technician for help.
You may also find helpful the following booklet, prepared by the FCC: “How to Identify and Resolve Radio-TV Interference Problems.” This booklet is available from the U.S. Government Printing Office, Washington D.C. 20402.
Changes and Modifications not expressly approved by the manufacturer or registrant of this equipment can void your authority to operate this equipment under Federal Communications Commissions rules.
Interference-Causing Equipment Standard
IC ES 003 : This Class B digital apparatus complies with Canadian ICES-003 Cet appareil numérique de la classe B est conform e à la norme NMB-003 du Canada.