
Trapmate Hub Installation & User Manual
Please set up and register this device FIRST!
In order to receive alerts, the Hub must be used in conjunction with a Sensor (sold separately) and the Skyhawk CE smartphone app.
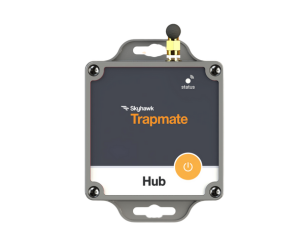
Hub
Kiwi
Sensors
Software/App
Unpacking and Inspection
Before you begin installation, unpack and verify you have all the correct parts.
(1) Hub
(1) Antenna
(3) AA lithium batteries (pre-installed)
(4) Rubber feet
(1) Screwdriver
(1) Quickstart guide
If you are missing any of these parts STOP, make sure you have your unit’s serial number and request a replacement.
Hub Layout Summary
Front of Unit
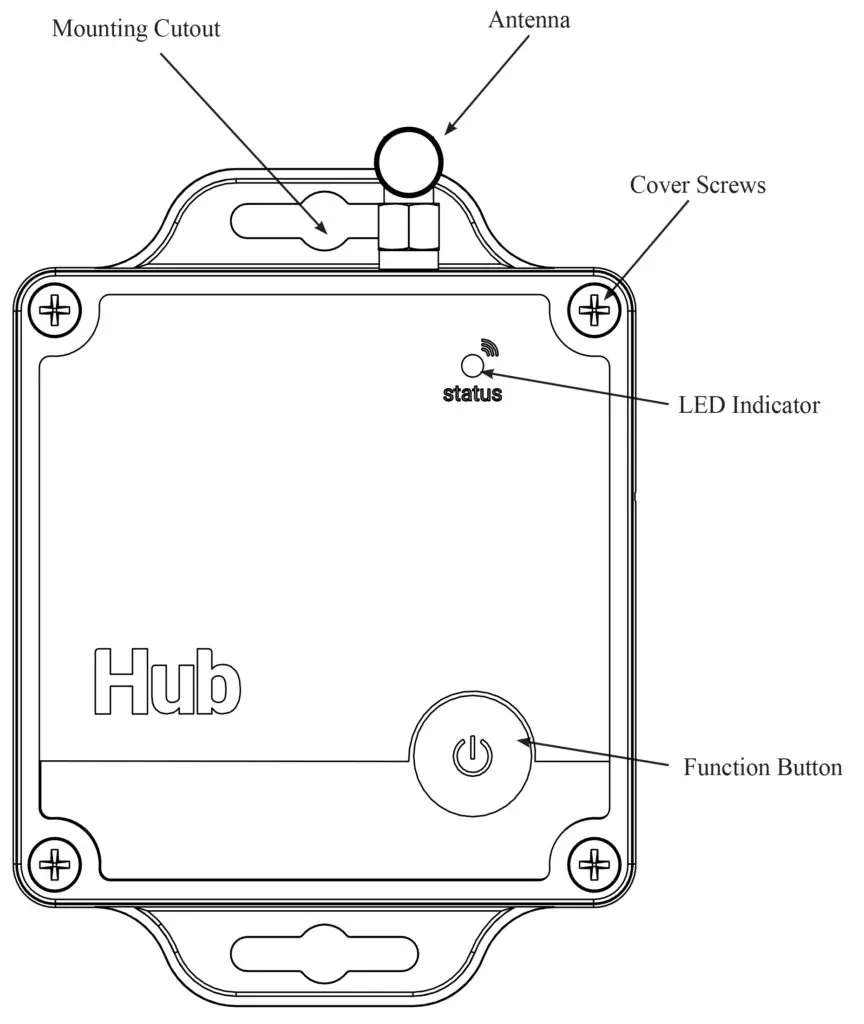
LED Indicator – This multicolored LED indicator will indicate various modes of operation. More details on the indicator colors can be found on page 14.
Function Button – This multi-use button can be used for various functions. See pages 10 and 11 for more details.
Antenna – This adjustable screw-on antenna is used to receive RF signals from the Sensors.
Front of Unit — Cover Removed
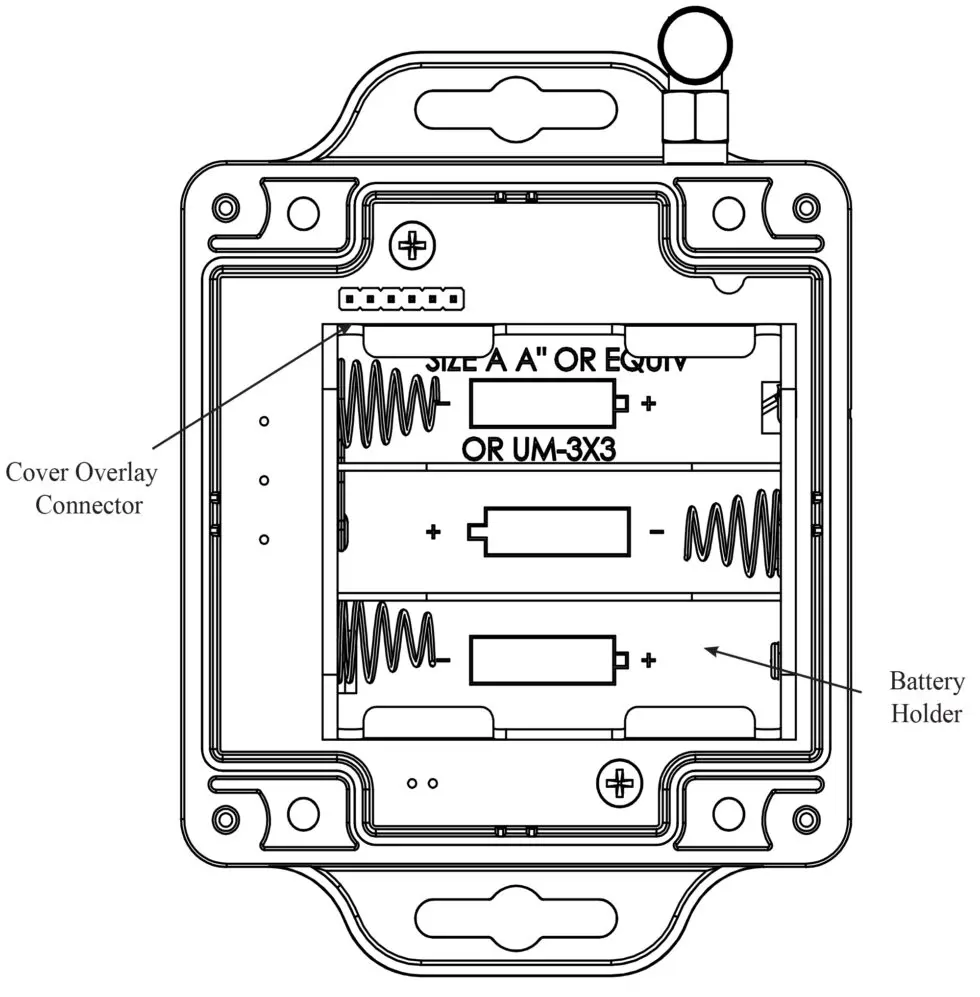
Cover Overlay Connector – This connector is used to connect the cover’s overlay 6-pin connector.
Battery Holder – The battery holder accommodates 3 x AA batteries. It is suggested that 1.5 volt like an Energizer Advanced Lithium or Ultimate Lithium are used for extended life.
Hub Installation
The Hub can be installed using various methods including, but not limited to, dual-lock strips, magnets or rubber feet. Some of these mounting accessories may be included with the Hub accessory kit.
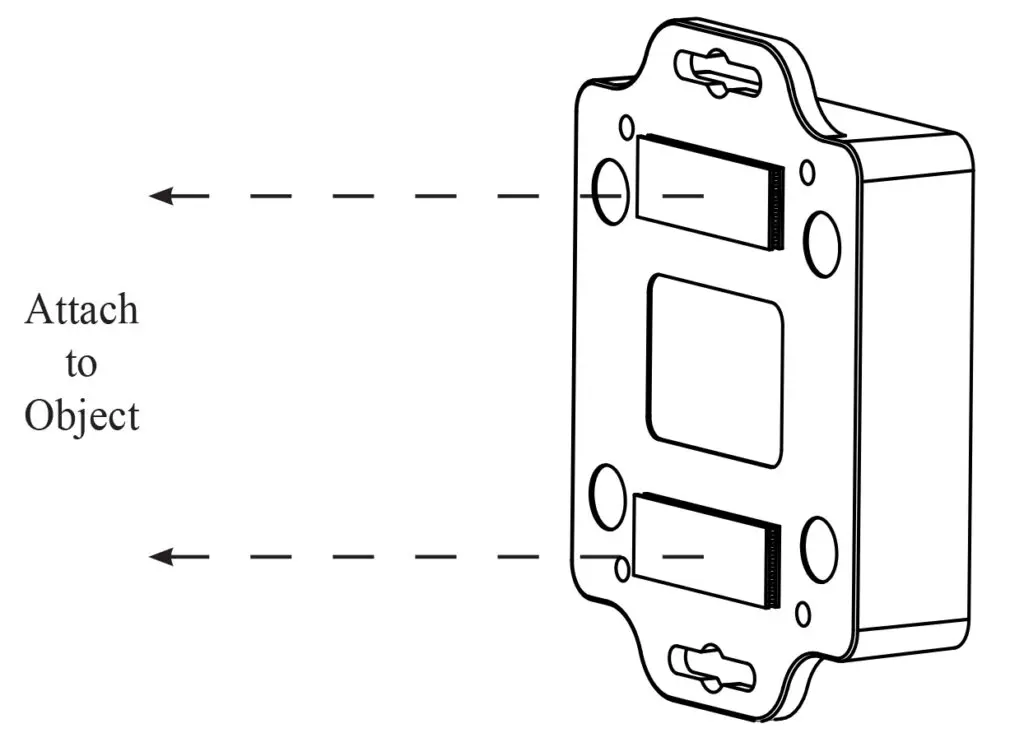
Method 1 : Dual-Lock Strips (if included)
Step 1: In the accessory kit, locate the two sets of dual-lock strips. Keep these strips together and do not separate them at this time!
Step 2: Clean the rear surface of the Hub with 70% isopropyl alcohol for proper bonding of the strips.
Step 3: Peel one side only of each set of strips to expose the adhesive and affix to the rear of the unit.
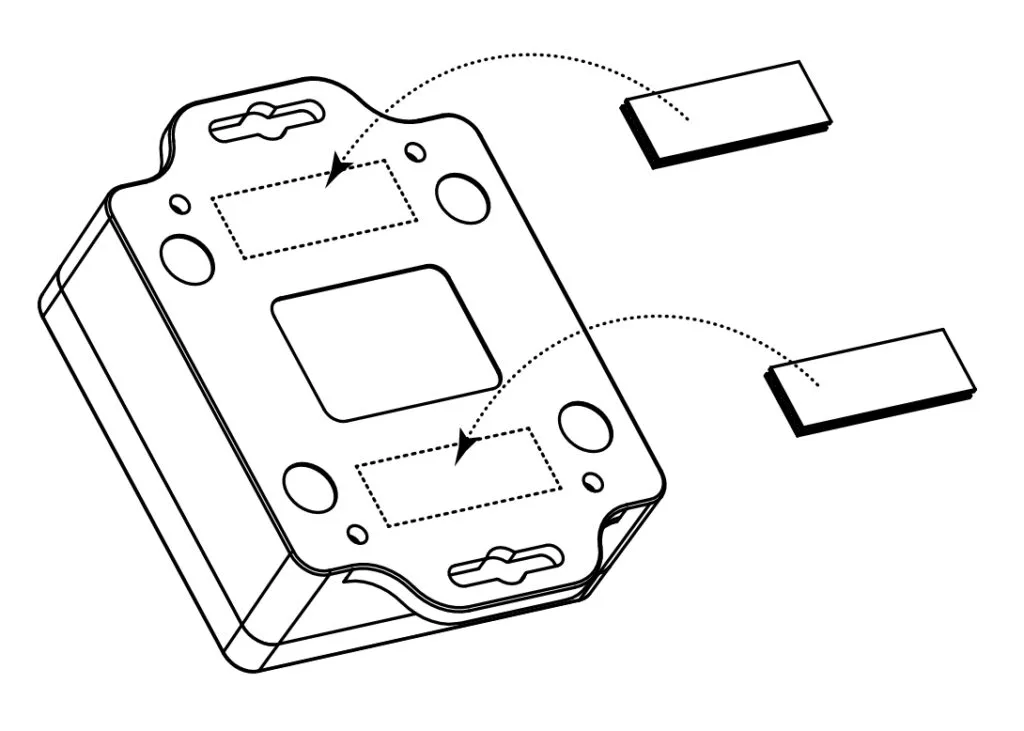
Step 4: Make sure the area where the Hub will be attached has a clean surface for proper bonding of the strips. Do not separate the strips from the back of the unit at this time!
Step 5: Peel the remaining side of each of the strips to expose the adhesive and position it on the object and press down on the whole Hub. Do not remove the Hub at this time – give the dual-lock adhesive about 30-minutes to bond.
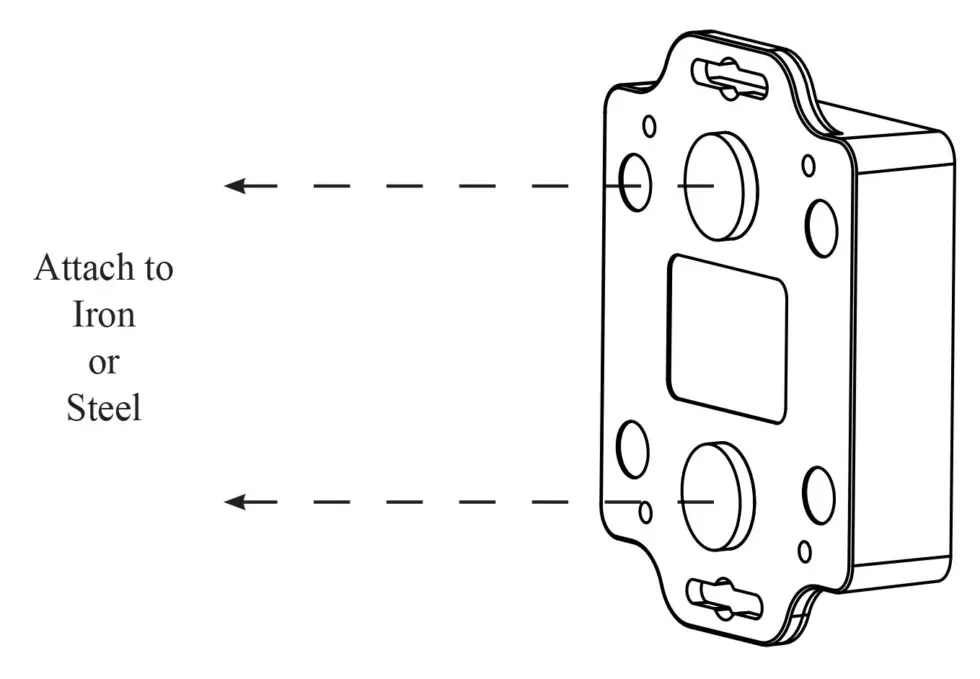
Method 2 : Self-Stick Mounting Magnets (if included)
Step 1: In the accessory kit, locate the two self-stick mounting magnets.
Step 2: Clean the rear surface of the Hub with 70% isopropyl alcohol for proper bonding of the magnets.
Step 3: Peel off the paper to expose the adhesive and affix magnets to the rear of the unit.
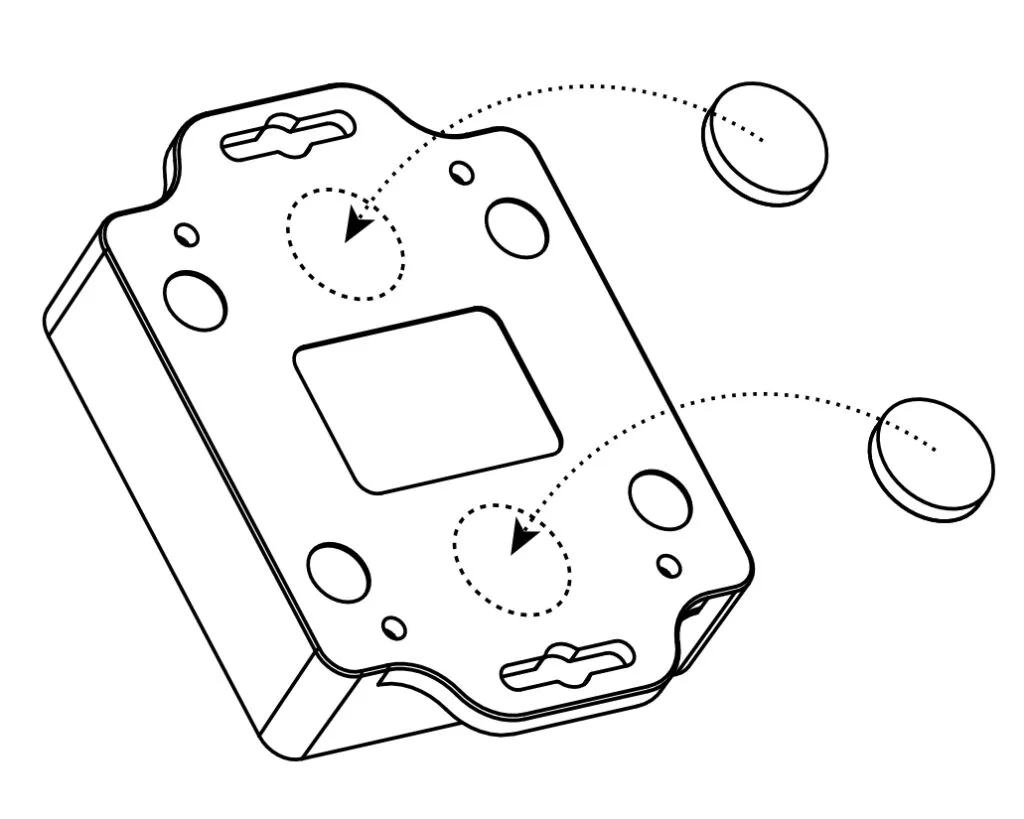
Step 4: The Hub is ready to be mounted. Make sure the area where the Hub will be attached is ferrous iron or steel.
Method 3 : Self-Stick Rubber Mounting Feet (if included)
Step 1: In the accessory kit, locate the four self-stick rubber mounting feet.
Step 2: Clean the four circular recessed areas on the back of the Hub with 70% isopropyl alcohol for proper bonding of the feet.
Step 3: Peel back the paper on the rubber feet to expose the adhesive and affix them to the designated areas on the back of the unit.
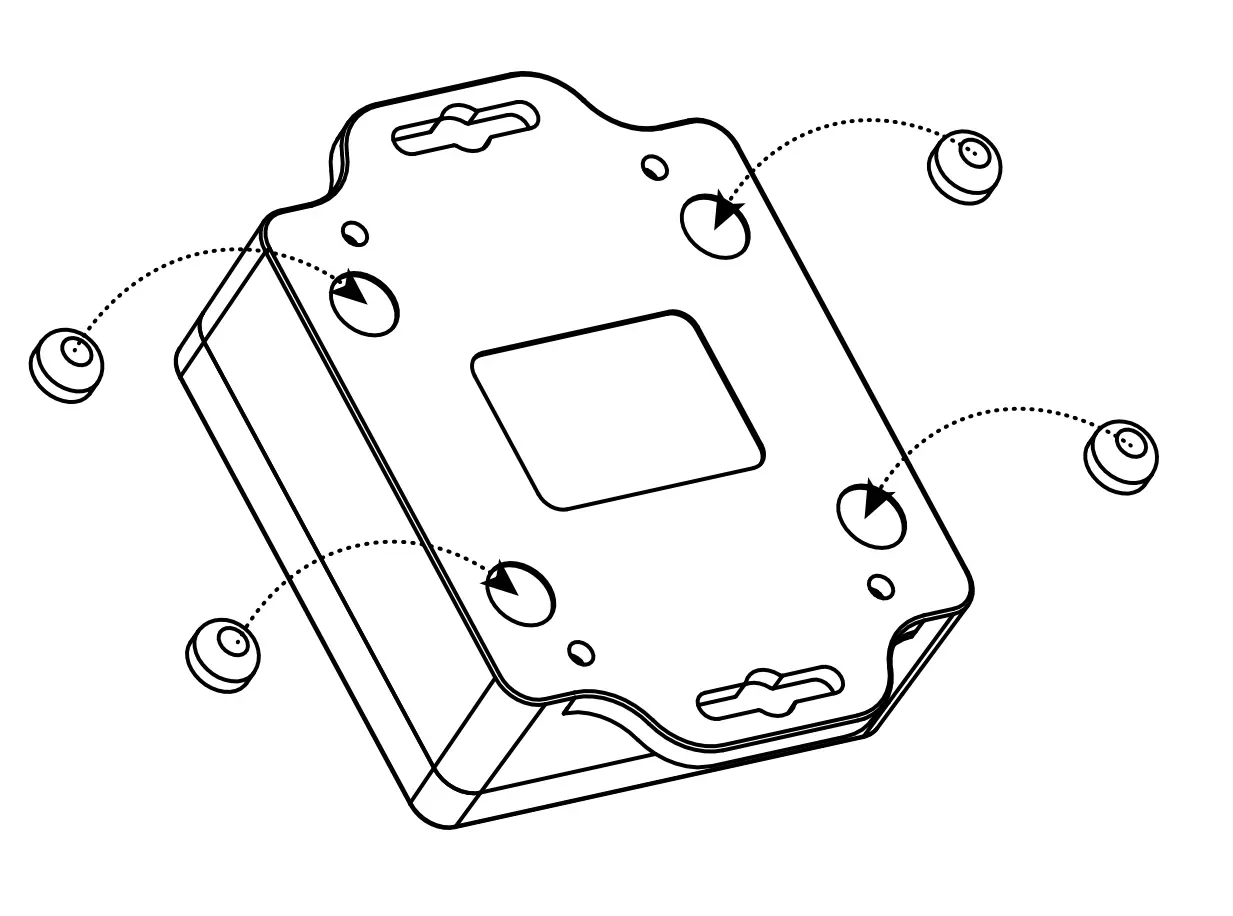
Step 4: The Hub is ready to be mounted. Place the Hub on a flat surface, such as a table or shelf.
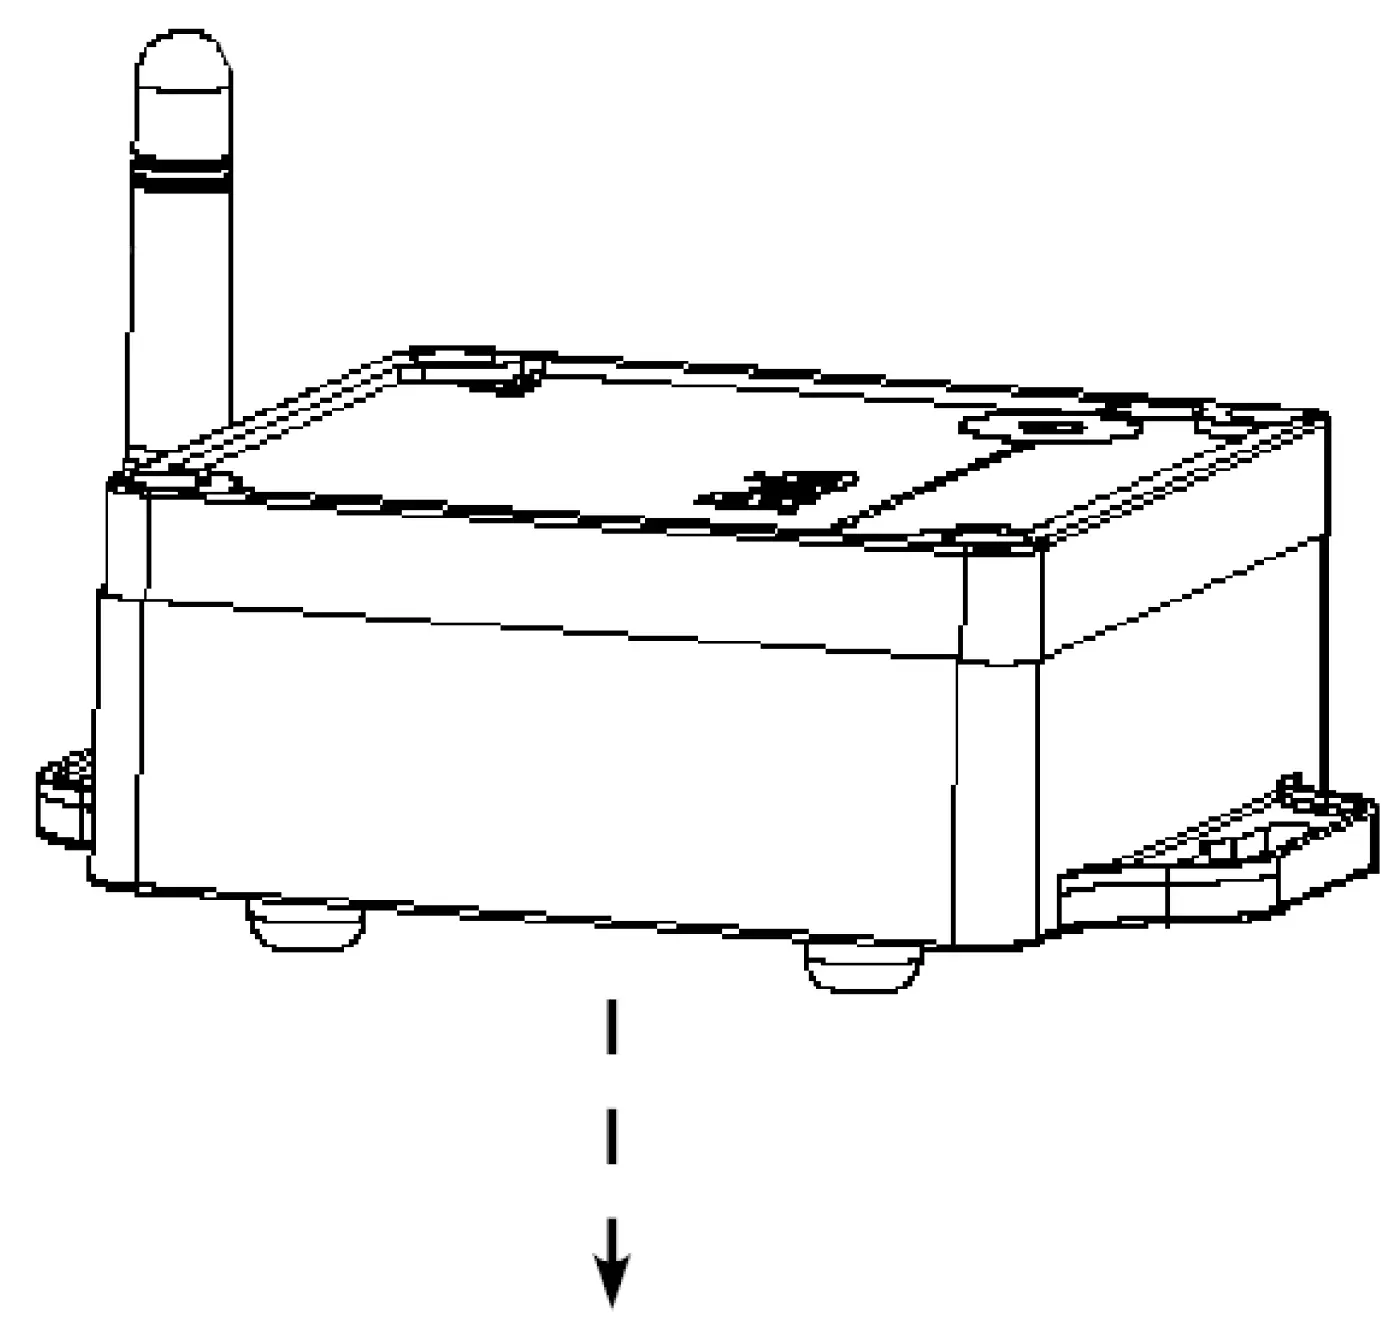
Installation – Safety Guidelines
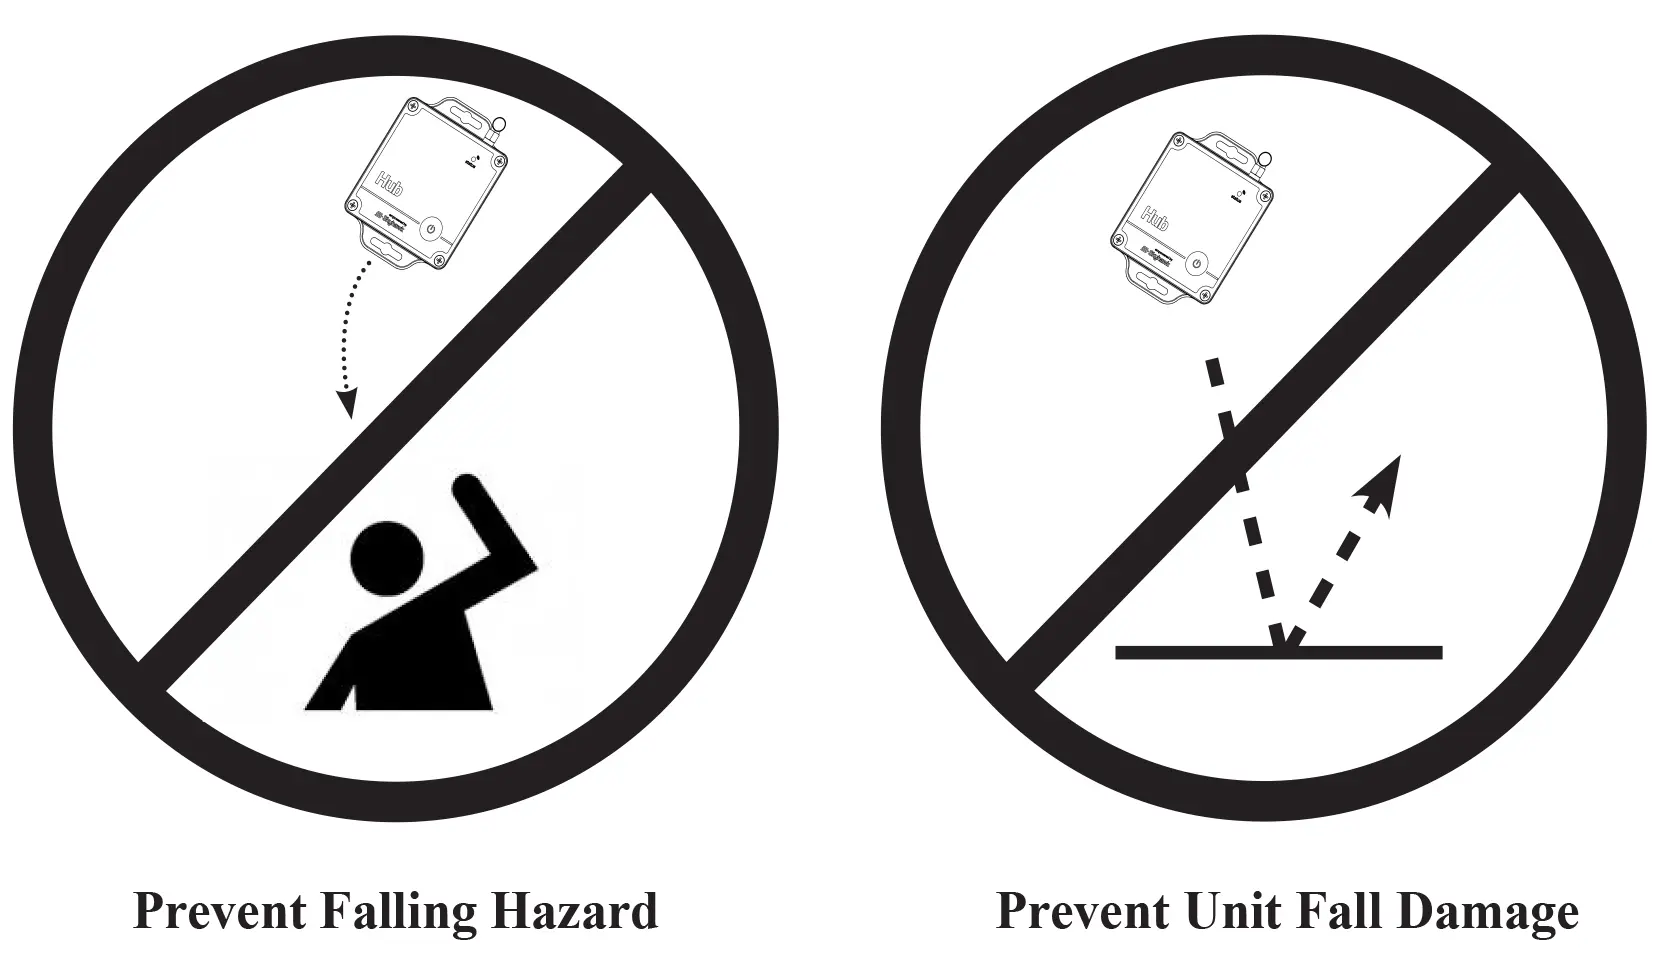
Make sure when placing the Hub on an object that it is securely attached and cannot fall off and injure someone
or fall onto a hard surface and damage the unit.
Make sure that when placing the Hub that it will not interfere with other equipment.
Hub Start-Up Operation
Before moving forward with the unit operation, you must download the Skyhawk CE app onto your smart device and sign up for an account.
Step 1: Download and install the Skyhawk CE app from the Apple or Google Play Store onto your compatible smart device. Go to sky-hawk.com for more detailed information on which devices are supported.
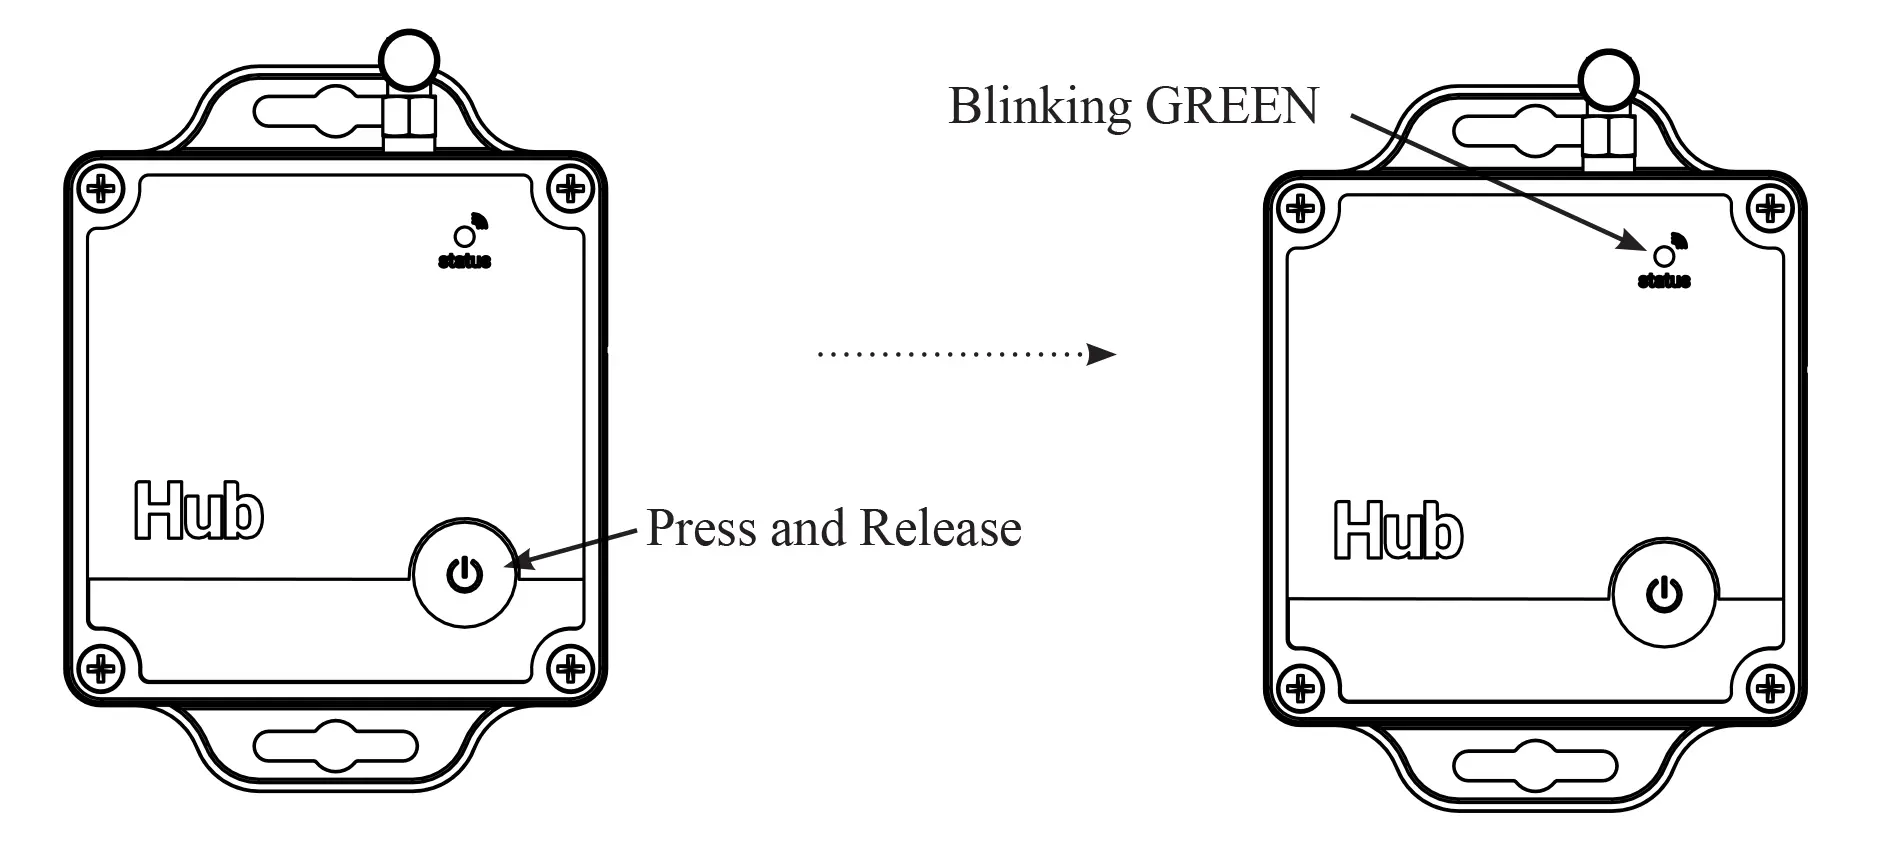
Step 2: Power ON the Hub by pressing and releasing the function button; release when GREEN LED starts blinking. Unit will continue to power ON by blinking the GREEN LED for about 30 to 60 seconds.
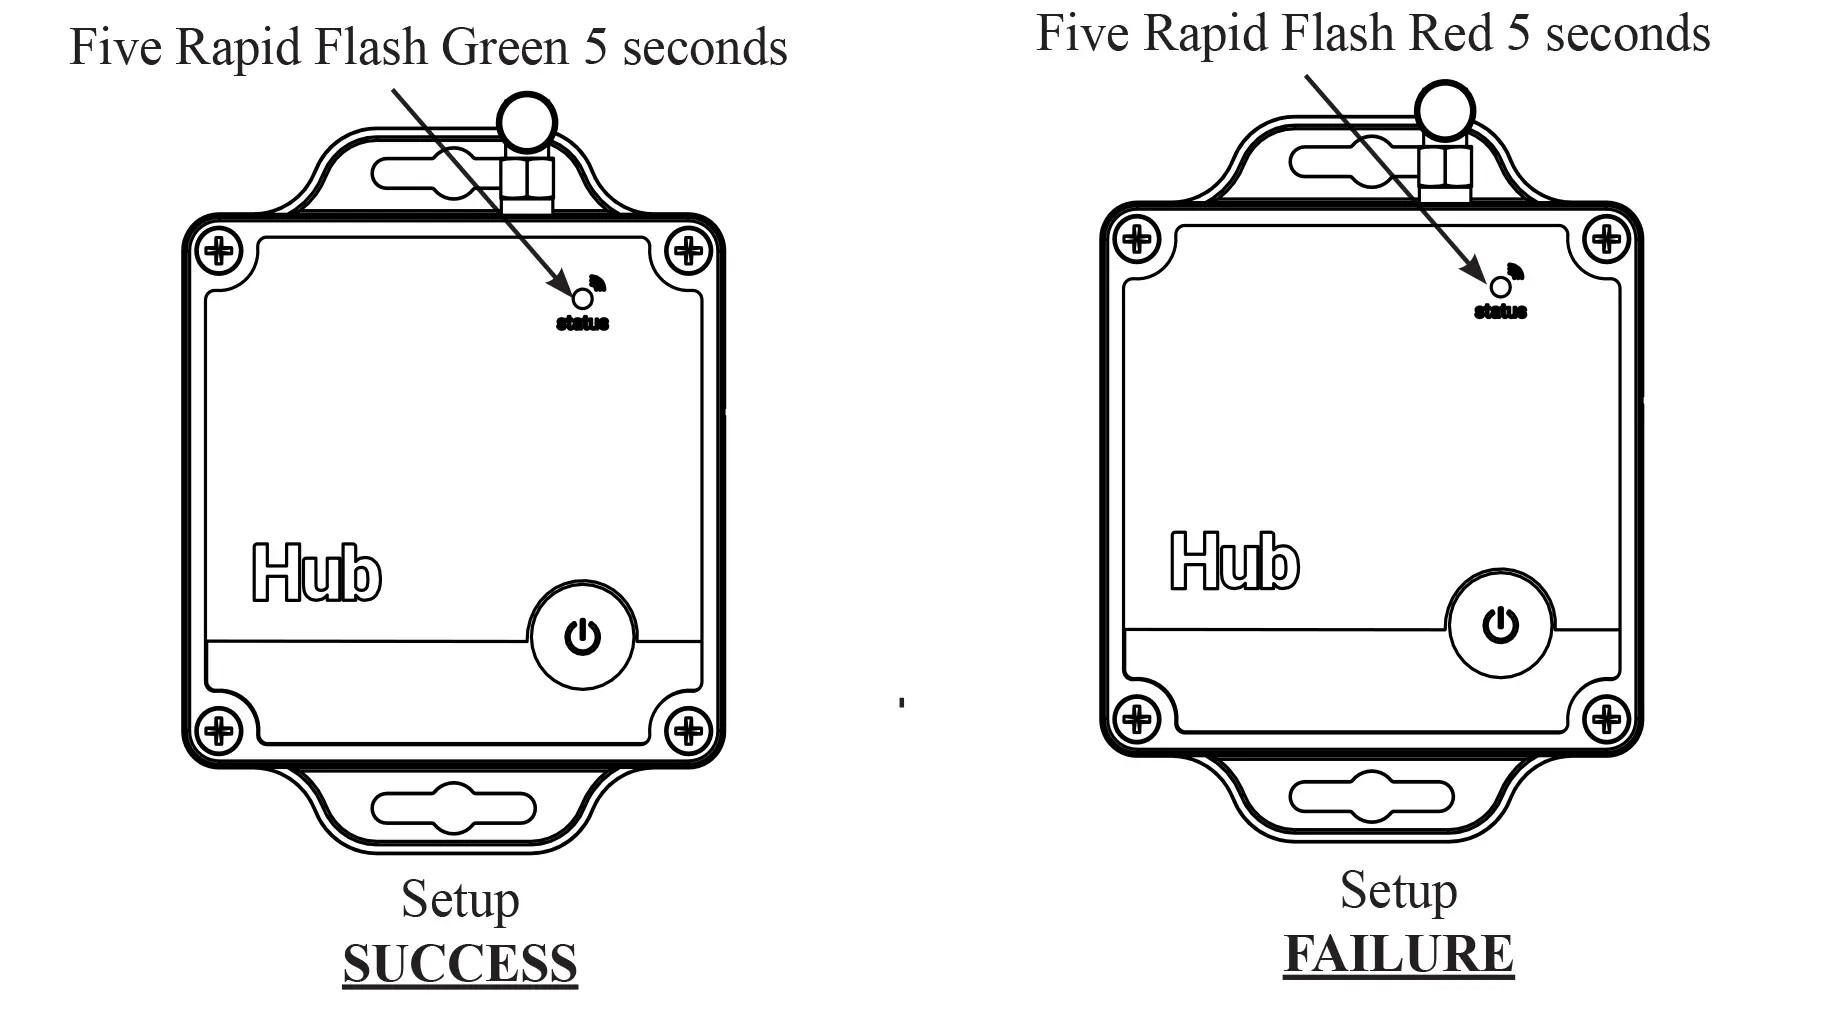
Step 3: After the unit finishes the power ON process, the GREEN LED will rapid flash Green for 5 seconds and the unit will automatically send a power ON alert to the Skyhawk CE app via the cellular network. If the connection is unsuccessful, then the Skyhawk CE will not acknowledge any communication and the LED will rapid flash RED for 5 seconds. Any communication failure will place the unit into a timed retry mode, and after several retries it then will give up.
Step 4: The Hub now automatically goes into listening mode. The Hub blinks GREEN once every 10 seconds during listening mode. When it receives an RF signal from any sensor, it will blink BLUE twice and then initiate a call where it blinks BLUE until the transmission is over and relays this information to the Skyhawk app via the cellular network.
Hub Shut-Down Operation
When the Hub is not going to be used for more than a few weeks it should be powered down to conserve battery life.
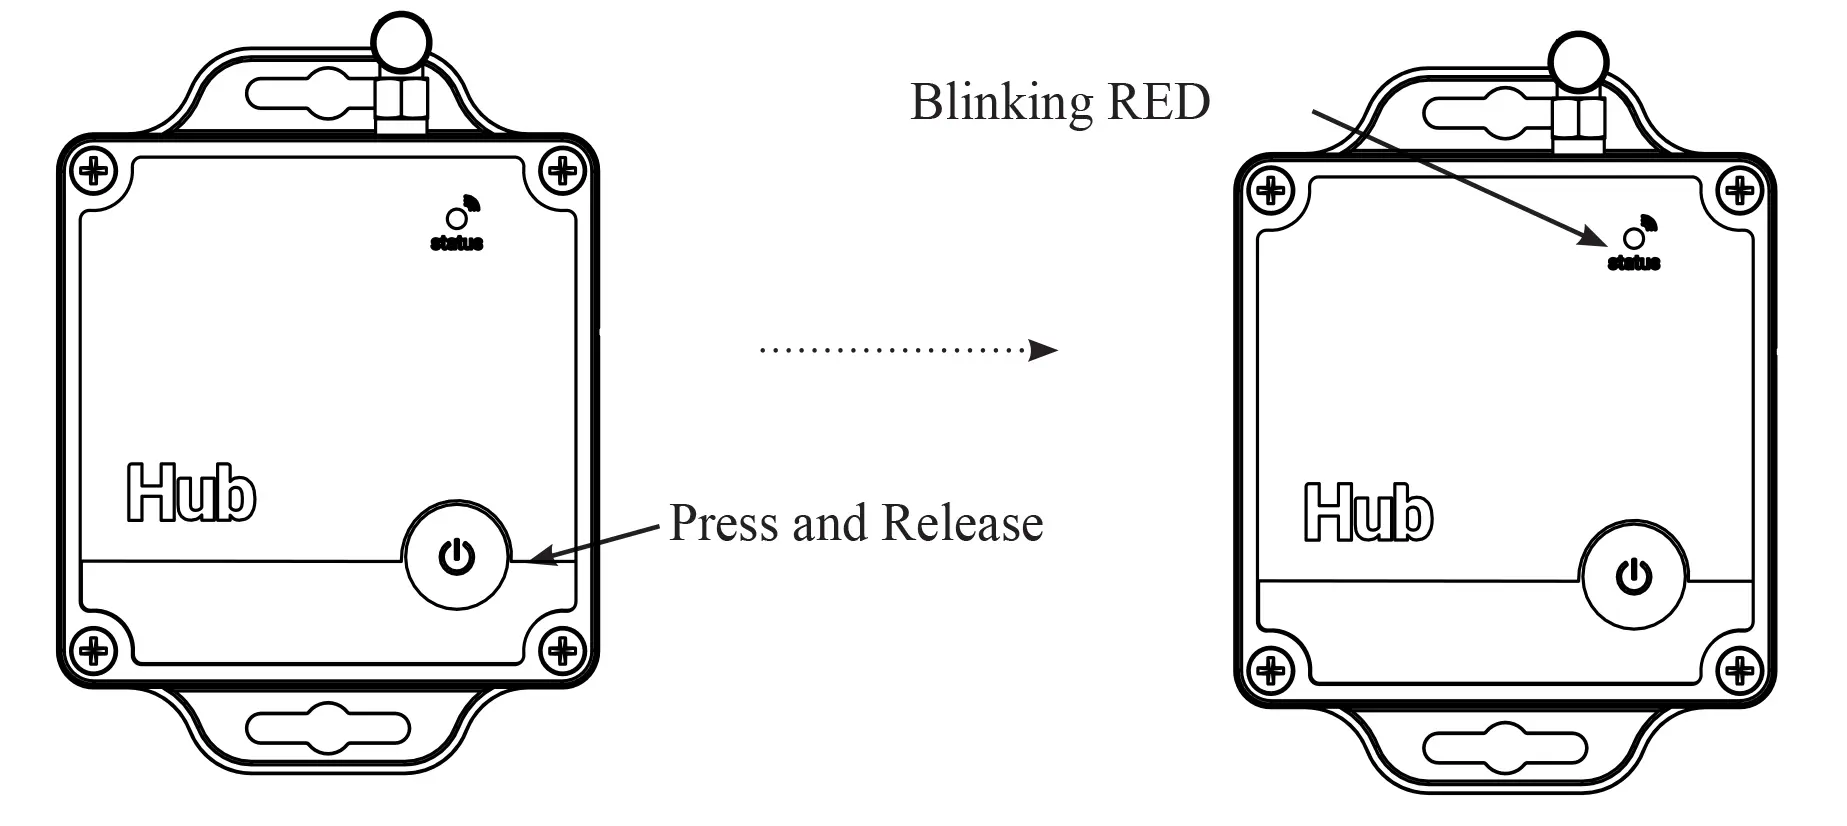
Step 1: Power OFF the Hub by pressing and releasing the function button.
Step 2: During the power down process (while the LED is blinking RED) the unit will send an alert to make sure that the registered owner of the device is notified the Hub is going off-line. During the transmission of a power down, the unit will blink BLUE.
Hub Reset Operation
The Hub has the ability to be reset back to default settings.
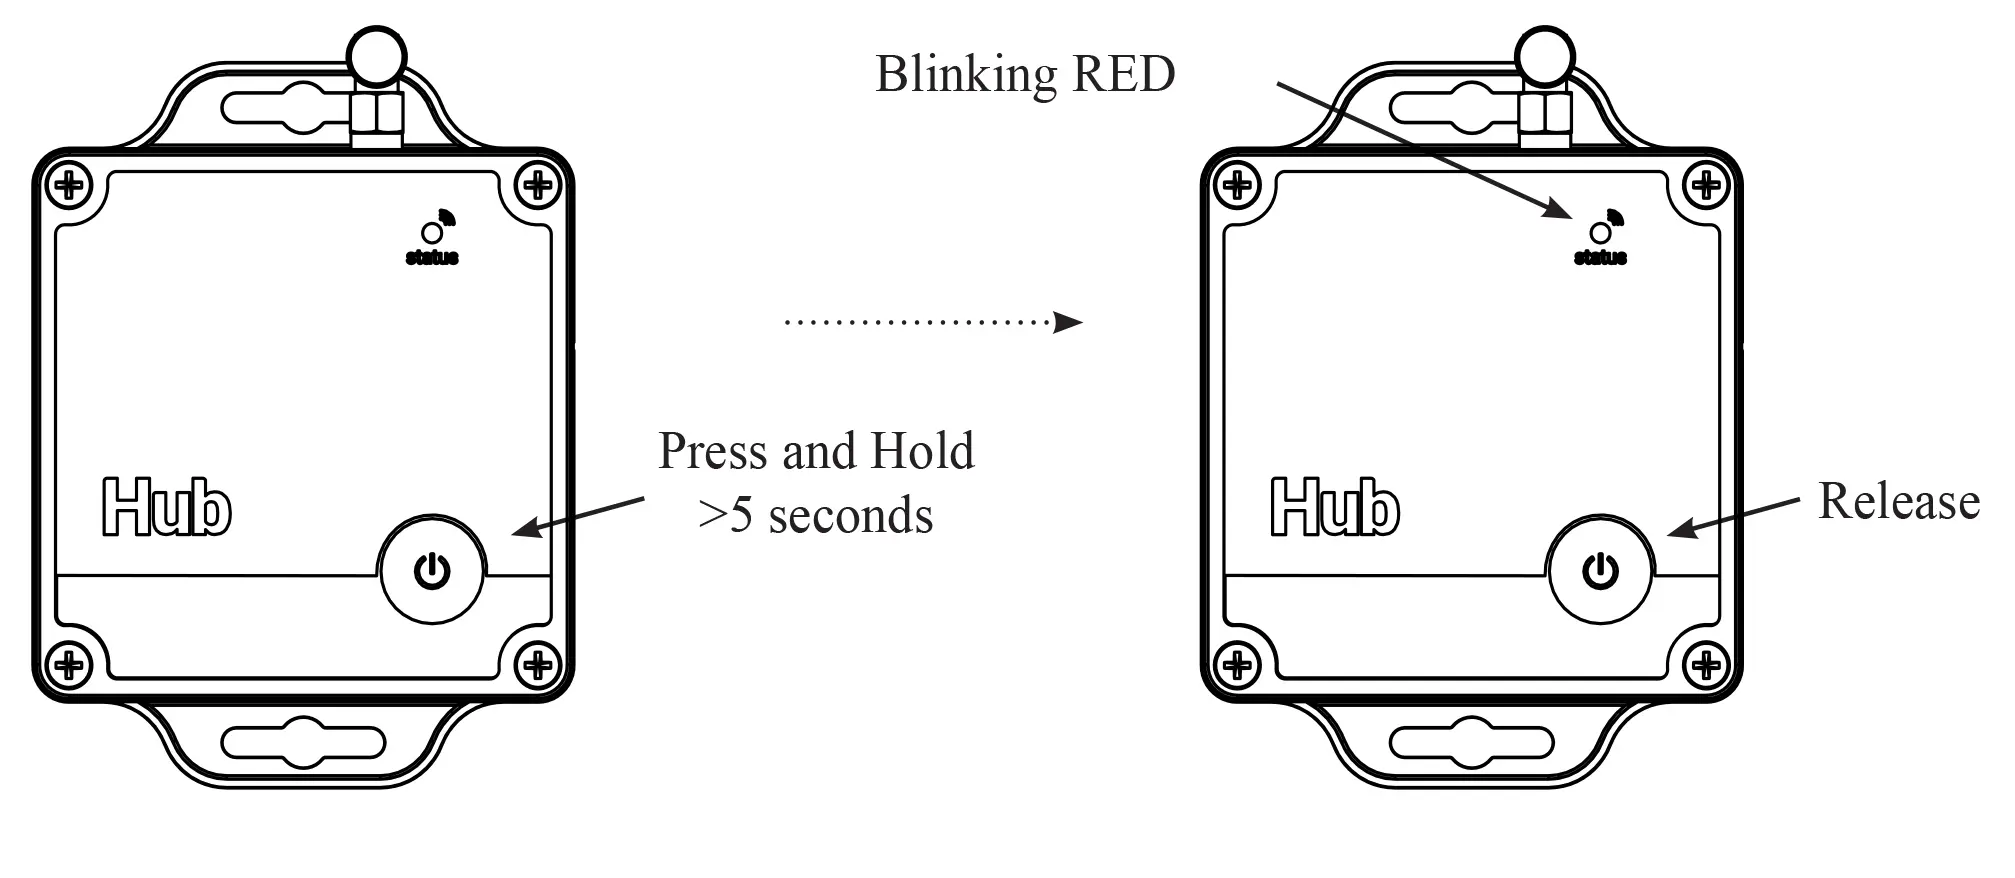
Step 1: Press and HOLD the function button for more than 5 seconds.
Step 2: The LED will go solid RED, prompting the release of the button to initiate the reset.
Hub Reset Operation
The Hub has the ability to be reset back to default settings.
Step 1: Press and HOLD the function button for more than 5 seconds.
Step 2: The LED will go solid RED, prompting the release of the button to initiate the reset.
Hub Battery Replacement
The Hub comes with three AA 1.5 volt lithium batteries already installed but in time these will need to be replaced. When they are replaced it is suggested to use a high quality name brand AA lithium battery like an Energizer Advanced Lithium or Ultimate Lithium battery. Follow the instructions below to replace these batteries.
Step 1: Remove the cover screws of the Hub using a Phillips screwdriver. Make sure to turn the screws counterclockwise.
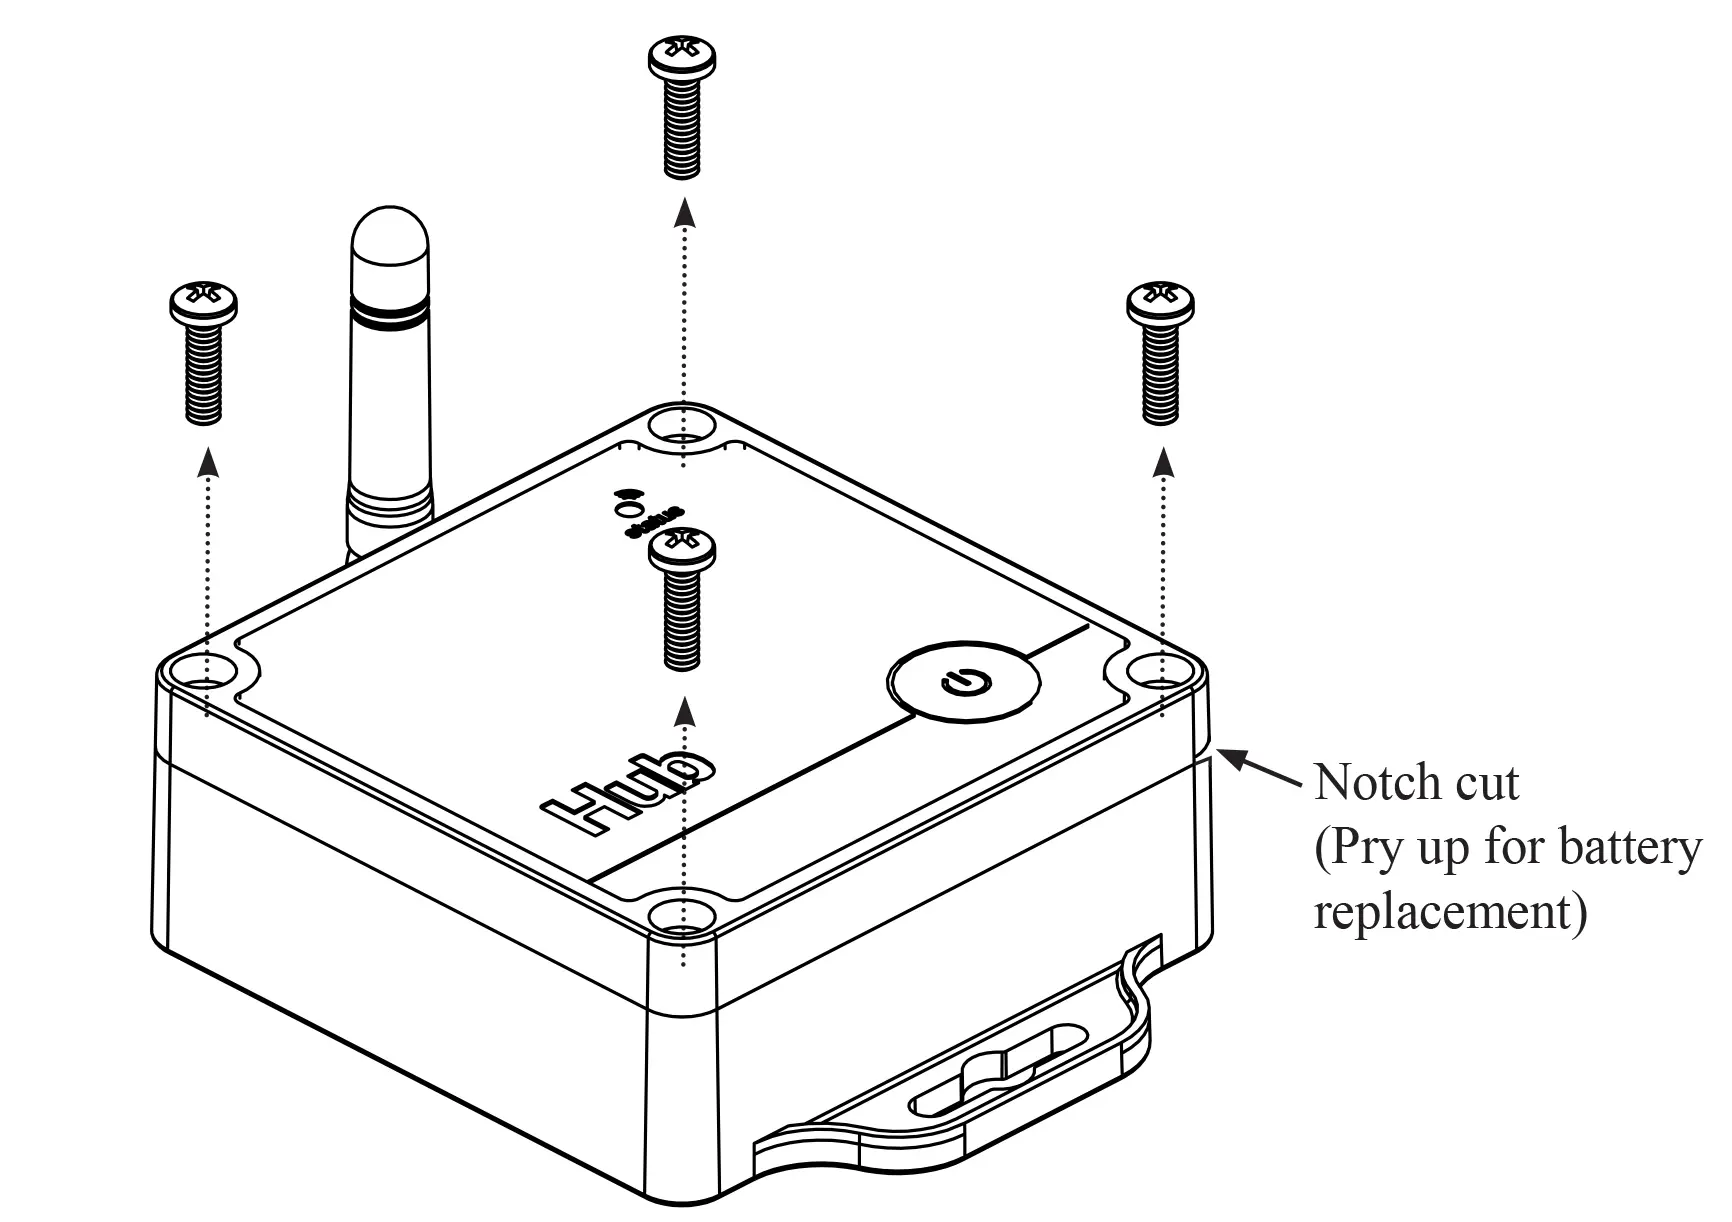
Step 2: Open the cover by tilting the cover’s front up toward the rear to prevent damage to the overlay connection. If connection becomes loose it can be reseated. There will be a gasket holding the unit together so it might take a bit of force to separate the cover from the enclosure.
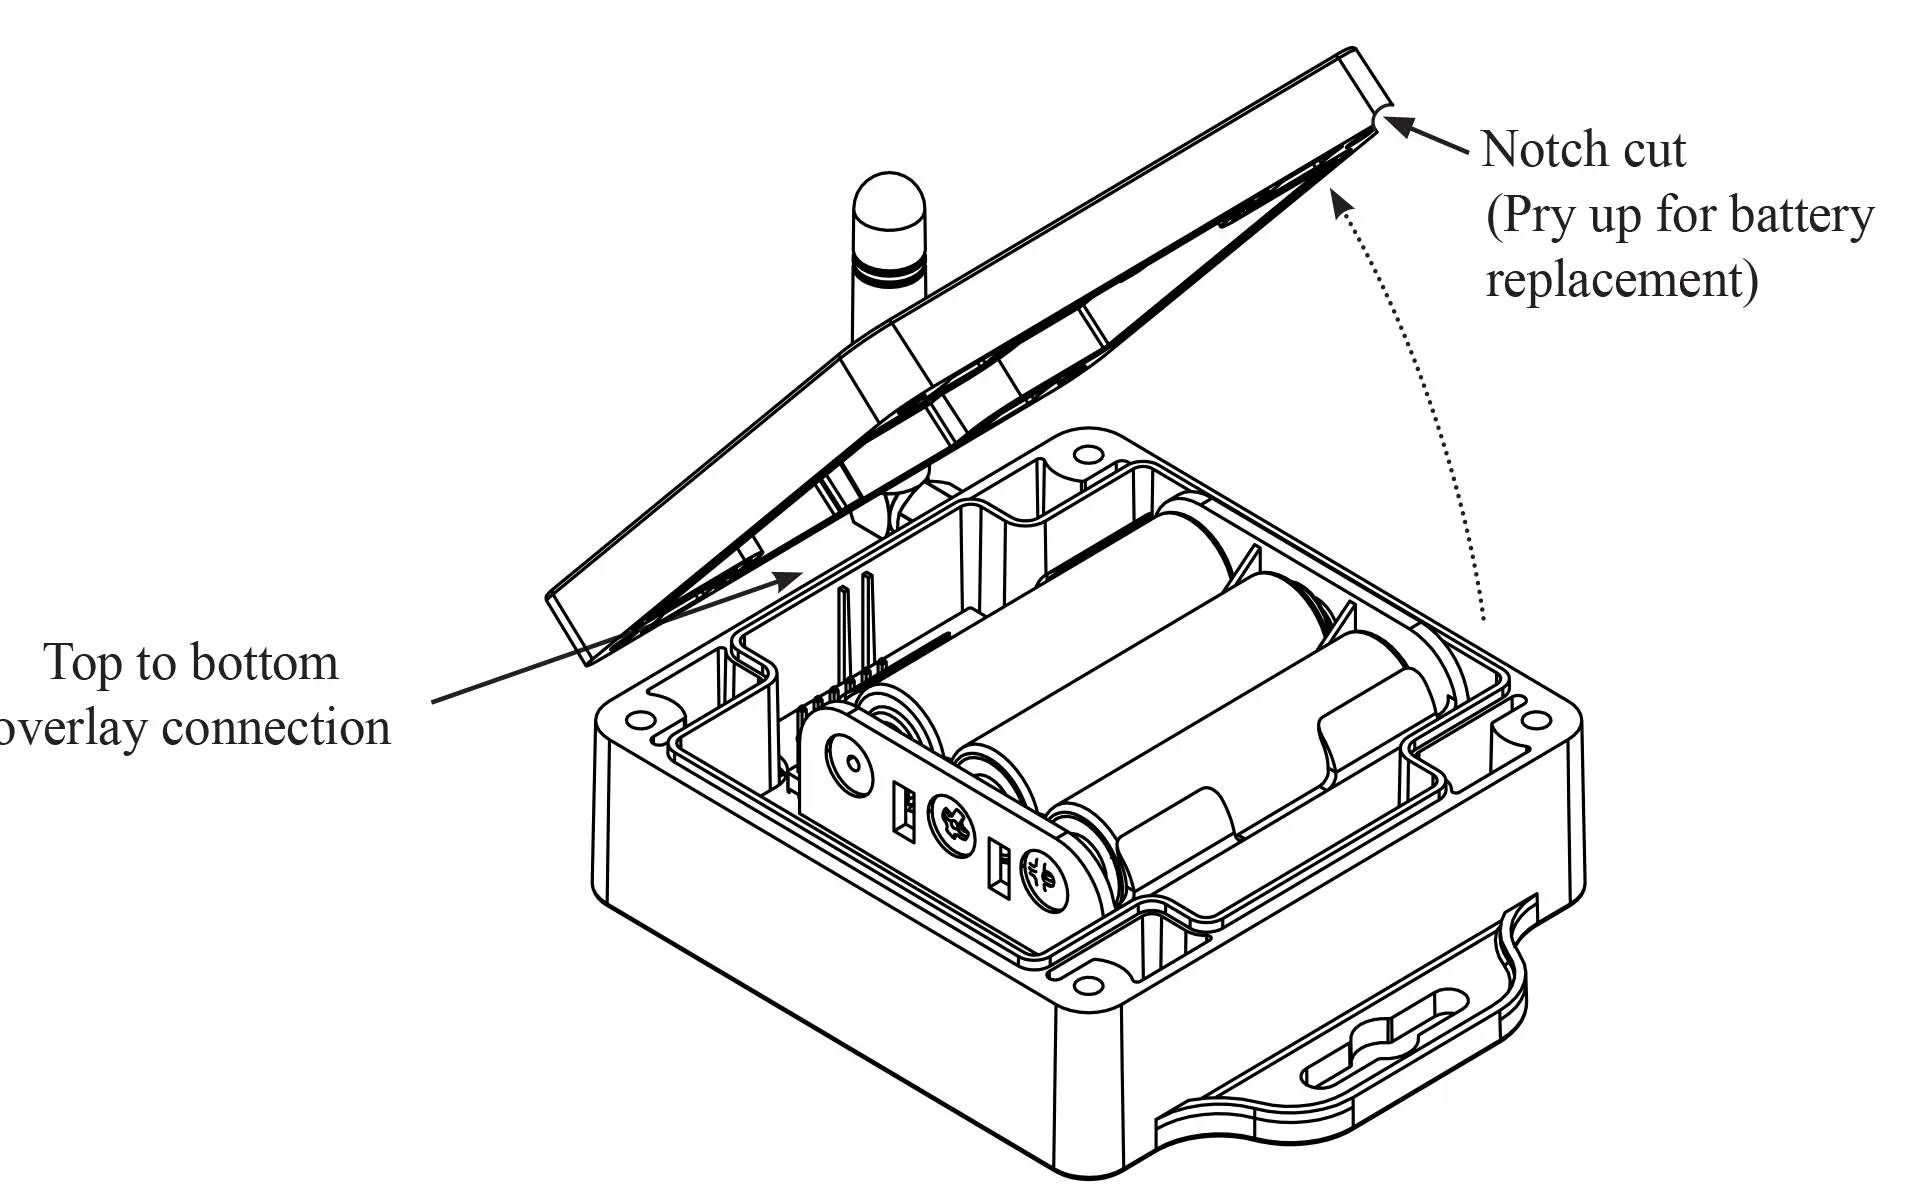
Step 3: Remove and dispose of the old batteries properly.
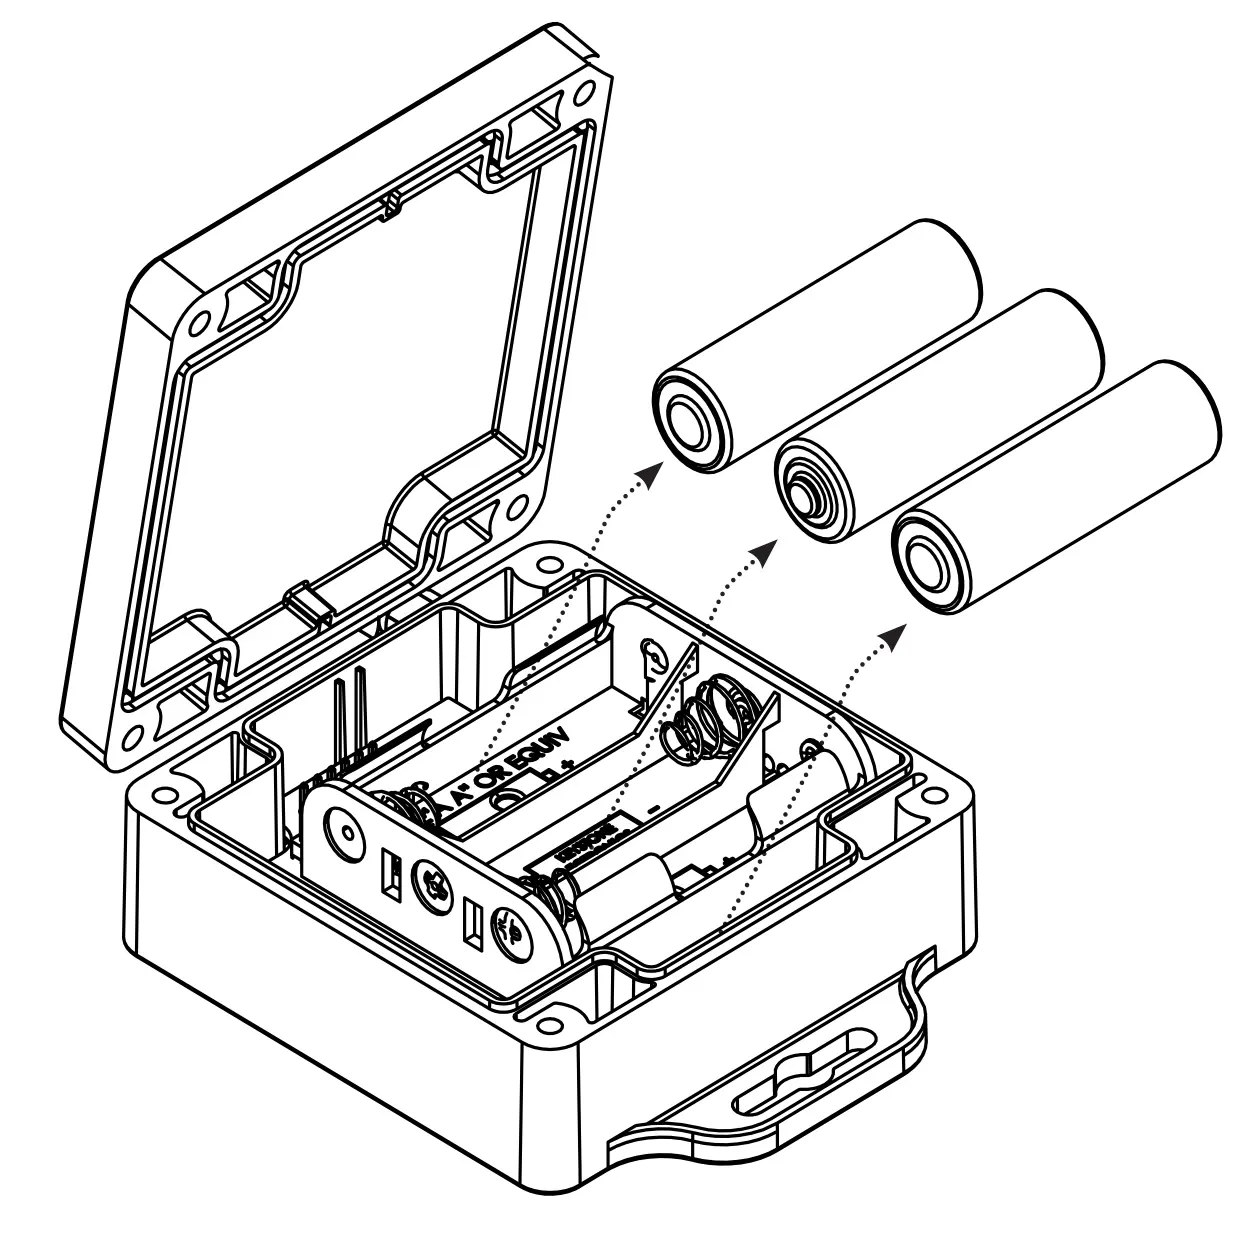
Step 4: Insert new batteries, taking note of the direction symbols.
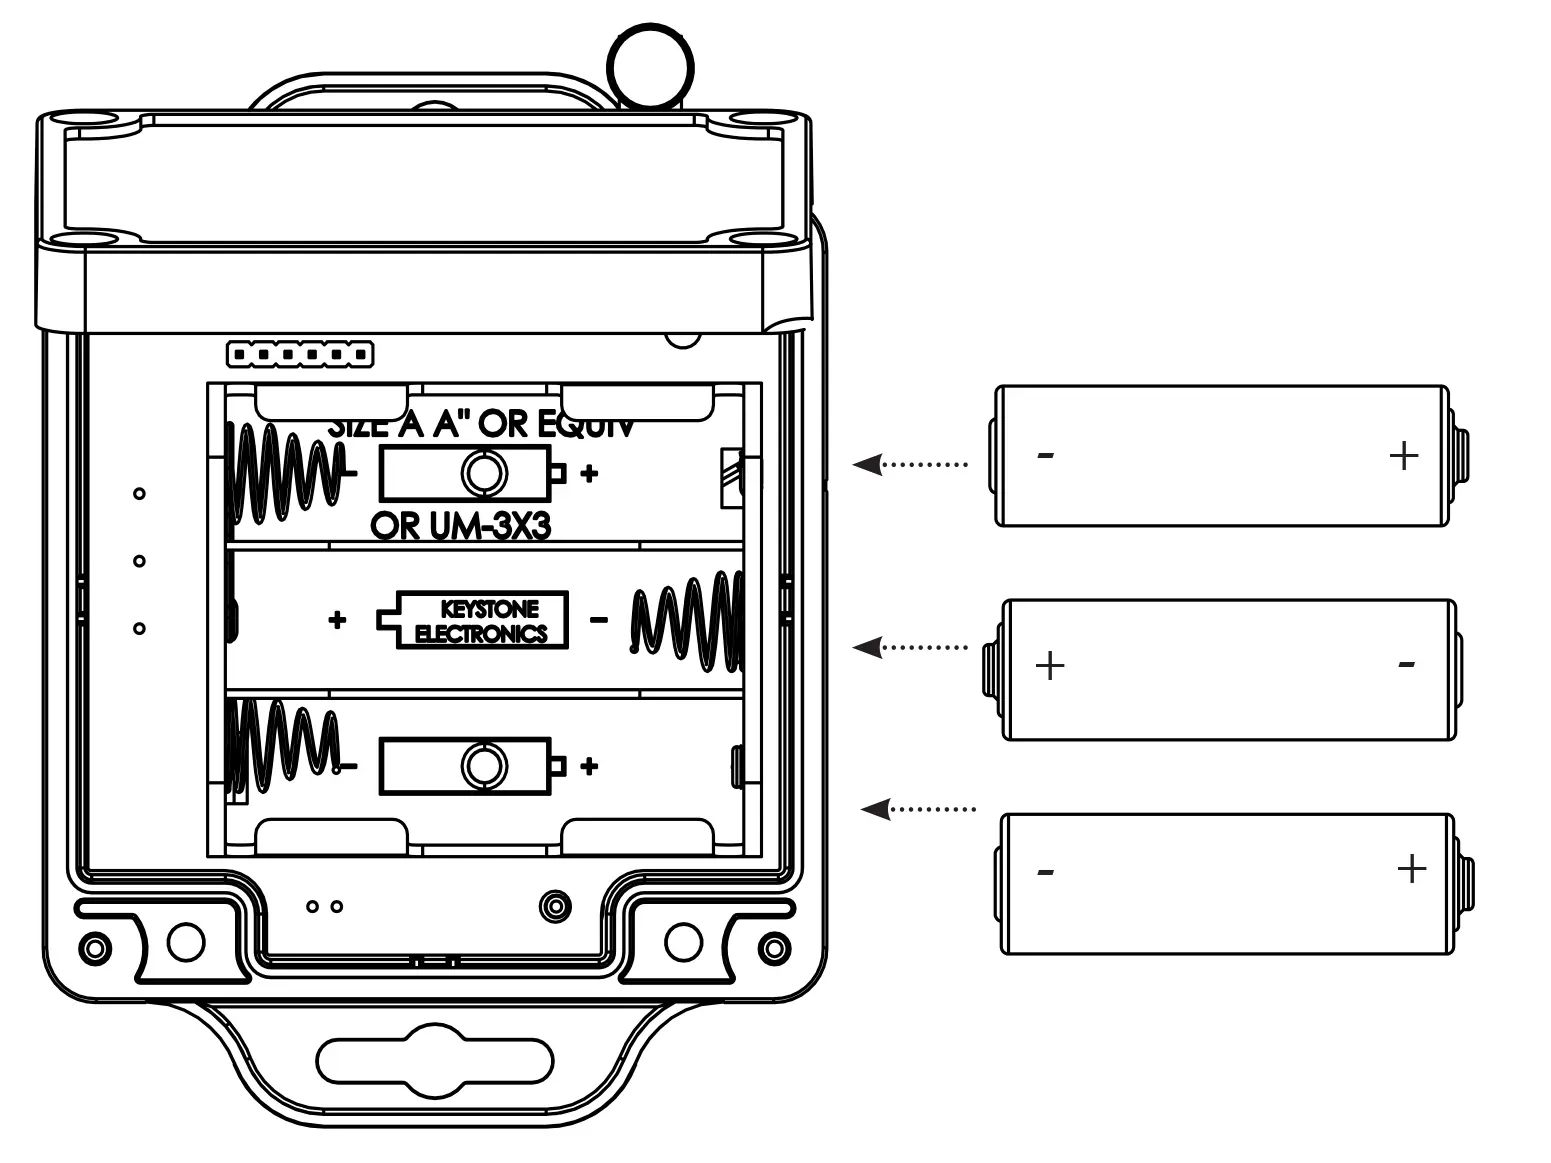
Step 5: Replace cover, making sure overlay connector is seated to the on-board connector. Replace cover screws. Turn screws clockwise until top is seated.
Hub LED Indicators
The Hub is equipped with a multi-color LED indicator for feedback status to the user.
Below is a chart of the status indicators:
| Power Up | Blink GREEN LED for about 30 seconds |
| Power Down | Blink RED LED for about 30 seconds |
| Receive RF trigger from sensor | Blink BLUE LED twice |
| Reset | Solid RED LED, then reboot showing all colors flashing |
| Firmware Update | Blink BLUE LED until completed |
| *Success Indicator | Rapid Flashing GREEN for 5 seconds after operation |
| *Failure Indicator | Rapid Flashing RED for 5 seconds after operation |
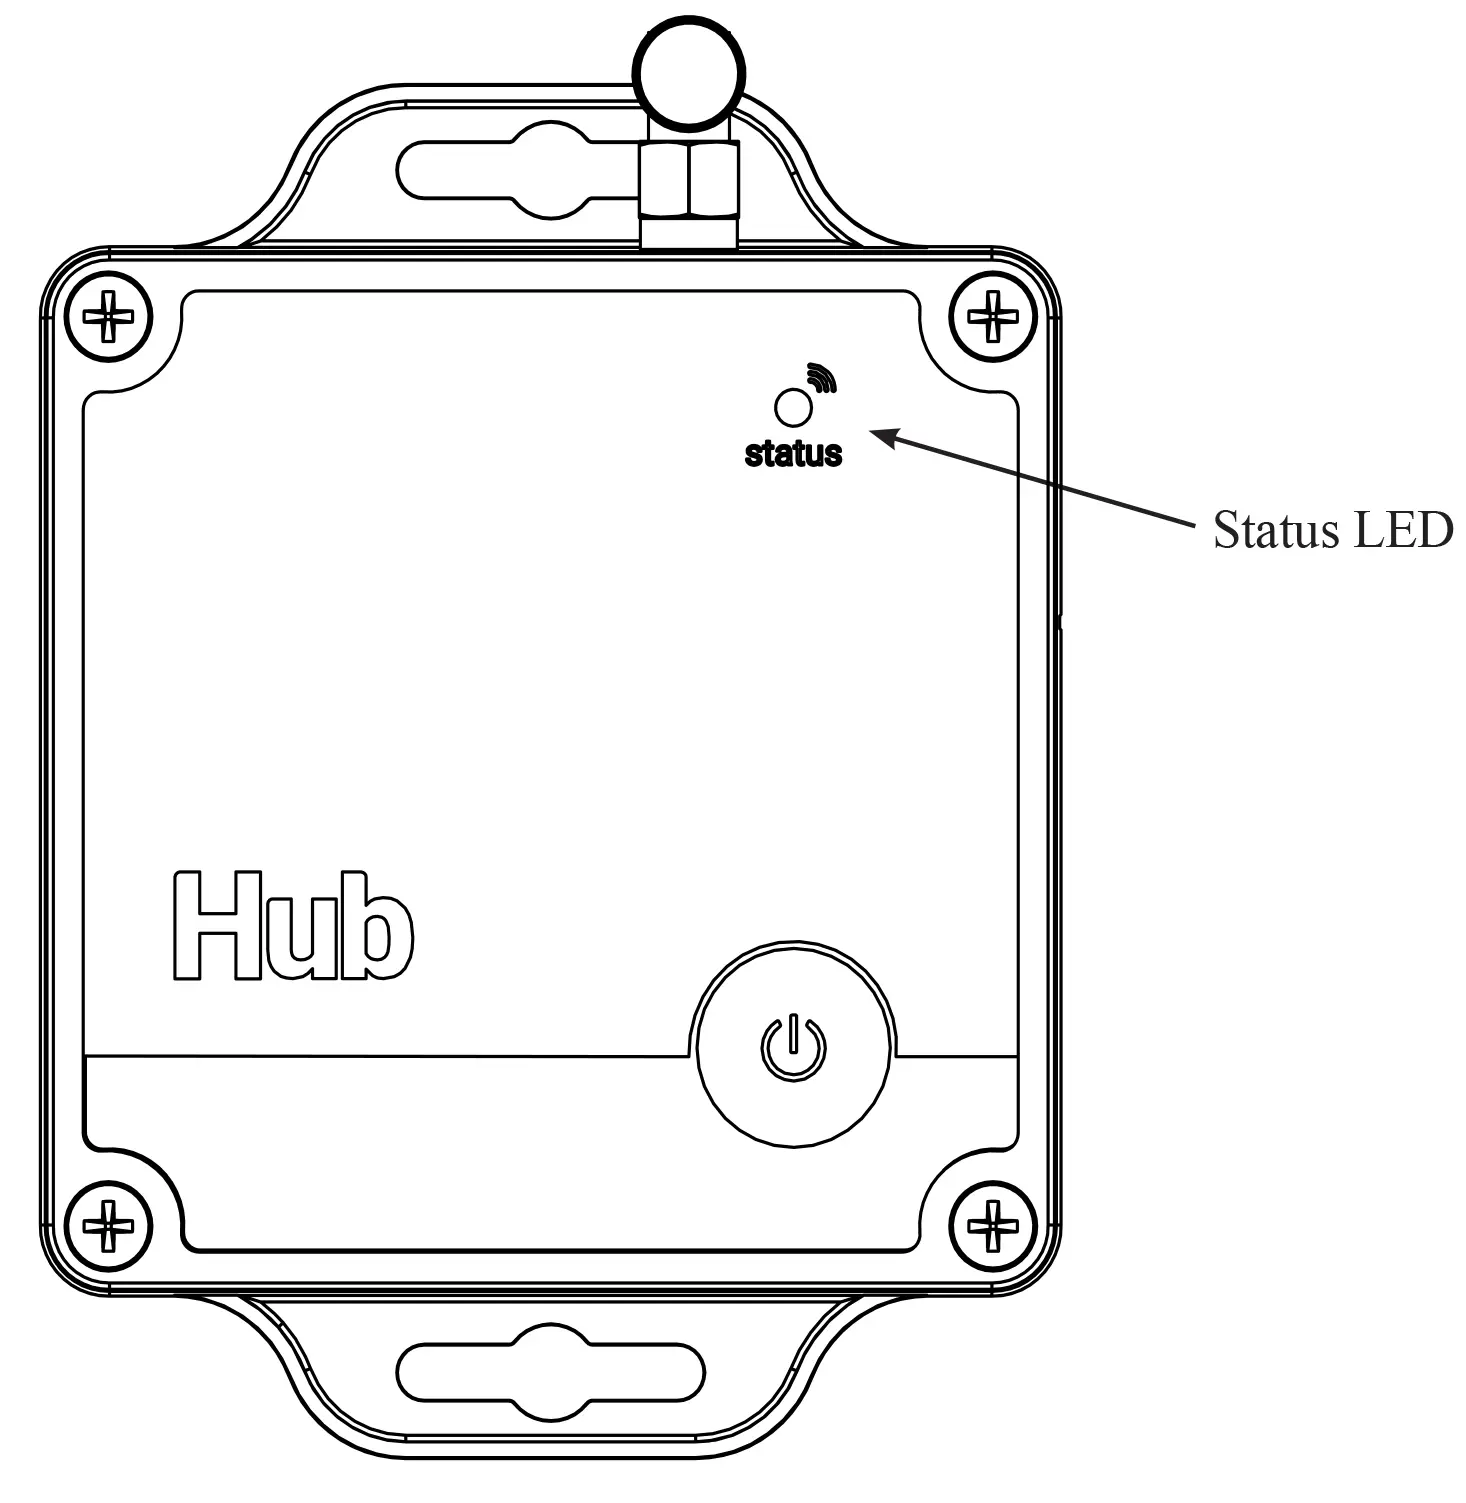
* These indicators are used to verify that the data from a sensor trigger, configuration change or firmware update has been successfully or unsuccessfully communicated between the unit and cloud server/Skyhawk app.
While unit is ON and not being triggered a status LED will flash every 10 seconds:
| Last transmission was successful | Very fast GREEN blink (once) |
| Last transmission failed | Very fast RED blink/10 second GREEN blinks until it resends transmission |
| Unit currently paused | Very fast BLUE blink (once) |
Safety, FCC and Warranty
SAFETY AND USE RESTRICTIONS DO NOT USE HUB
- IN PLACE OF A LIFE SAFETY DEVICE.
- FOR MEDICAL MONITORING.
- IN A MANNER THAT VIOLATES ANY FEDERAL, STATE, LOCAL, ADMINISTRATIVE OR OTHER LAW, REGULATION, OR ORDINANCE, INCLUDING BUT NOT LIMITED TO GOVERNANCE OF CRIMINAL OR ILLEGAL ACTIVITY, DATA PRIVACY AND SECURITY, HEALTH AND SAFETY, ANIMAL WELFARE AND/OR WILDLIFE TRAPPING.
DO NOT ATTACH HUB DIRECTLY TO A LIFE SAFETY OR MEDICAL MONITORING DEVICE.
DO NOT PLACE OR POSITION HUB WHERE IT COULD INTERFERE WITH SAFE OPERATION AND FUNCTIONALITY OF LIFE SAFETY, MEDICAL MONITORING OR OTHER EQUIPMENT.
BATTERIES
The Hub uses hermetically sealed lithium iron disulfide batteries. Under normal conditions of use, lithium iron disulfide batteries are non-toxic and are not hazardous waste per the United States Resource Conservation and Recovery Act (RCRA) – 40 CFR Part 261 Subpart C. Dispose of in accordance with all applicable federal, state and local regulations.
WARNING: BATTERIES CAN EXPLODE OR LEAK AND CAUSE BURNS IF INSTALLED BACKWARDS, DISASSEMBLED, CHARGED, OR EXPOSED TO WATER, FIRE OR HIGH TEMPERATURE. EXPOSURE TO THE INGREDIENTS CONTAINED WITHIN OR THEIR COMBUSTION PRODUCTS COULD BE HARMFUL.
IMPORTANT NOTICE
The Hub uses a 3rd-party Wireless Service which uses radio technologies and is subject to transmission and service area limitations, which may include interruptions and dropped connections caused by atmospheric, topographical or environmental conditions, cell site availability, cellular network equipment or its installation, governmental regulations, system limitations, maintenance or other conditions or activities affecting the operation of the Wireless Service. The Wireless Service and/or features may not be available in all areas. For more information, visit sky-hawk.com.
FCC AND COMPLIANCE
This device complies with Part 15 of the FCC Rules Operation is subject to the following conditions:
- This device many not cause harmful interference, and
- This device must accept any interference received, Including interference that may cause undesired operation
RADIATION EXPOSURE STATEMENT: The device has been found to be compliant to the requirements set forth in CFR 47 Sections 2.1091 for an uncontrolled environment. The antenna(s) used for this transmitter must be installed to provide a separation distance of at least 20 cm from all persons and must not be co-located or operating in conjunction with any other antenna or transmitter.
RADIO AND TELEVISION INTERFERENCE: This equipment has been tested and found to comply with the limits, pursuant to Part 15 of the FCC rules. These limits are designed to provide reasonable protection against harmful interference in a residential installation. This equipment generates, uses and can radiate radio frequency energy and, if not installed and used in accordance with the instructions, may cause harmful interference to radio communications. However, there is no guarantee that interference will not occur in a particular installation. If this equipment does cause harmful interference to radio or television reception, which can be determined by turning the equipment off and on, the user is encouraged to try to correct the interference by one or more of the following measures:
- Reorient or relocate the receiving antenna.
- Increase the separation between the equipment and the receiver.
- Connect the equipment into an outlet on a circuit different from that to which the receiver is connected.
- Consult the dealer or an experienced radio/TV technician for help.
Changes and Modifications not expressly approved by the manufacturer or registrant of this equipment can void your authority to operate this equipment under Federal Communications Commissions rules.
IC ES 003 : This Class B digital apparatus complies with Canadian ICES-003 Cet appareil numérique de la classe B est conform e à la norme NMB-003 du
Canada.
LIMITED WARRANTY ON SKYHAWK HUB
THIS LIMITED WARRANTY GIVES YOU SPECIFIC LEGAL RIGHTS AND YOU MAY ALSO HAVE OTHER RIGHTS, WHICH VARY BY STATE, PROVINCE, OR JURISDICTION. THE LIMITED WARRANTY CAN ALSO BE FOUND ONLINE AT SKY-HAWK.COM/WARRANTY AND IN THE DOCUMENTATION WE PROVIDE WITH THE PRODUCT. WE WARRANT THAT DURING THE WARRANTY PERIOD, THE PRODUCT WILL BE FREE FROM DEFECTS IN MATERIALS AND WORKMANSHIP. WE LIMIT THE DURATION AND REMEDIES OF ALL IMPLIED WARRANTIES, INCLUDING WITHOUT LIMITATION THE WARRANTIES OF MERCHANTABILITY AND FITNESS FOR A PARTICULAR PURPOSE TO THE DURATION OF THIS EXPRESS LIMITED WARRANTY. SOME STATES DO NOT ALLOW LIMITATIONS ON HOW LONG AN IMPLIED WARRANTY LASTS, SO THE ABOVE LIMITATION MAY NOT APPLY TO YOU. OUR RESPONSIBILITY FOR DEFECTIVE GOODS IS LIMITED TO REPAIR OR REPLACEMENT AS DESCRIBED BELOW IN THIS WARRANTY STATEMENT.
WHO MAY USE THIS WARRANTY?
Pica Product Development, LLC located at address 4 Ash Street Extension, Derry, NH 03038 (“we”/ “our”) extend this limited warranty only to the consumer who originally purchased the Product (“you”/ “your”). It does not extend to any subsequent owner or other transferee of the Product.
WHAT DOES THIS WARRANTY COVER?
This limited warranty covers defects in materials and workmanship of the HUB (the “Product”) for the Warranty Period as defined below.
WHAT DOES THIS WARRANTY NOT COVER?
This limited warranty does not cover any damage due to: (a) transportation; (b) storage; (c) improper use; (d) failure to follow the Product instructions or to perform any preventive maintenance; (e) modifications; (f) unauthorized repair; (g) normal wear and tear; or (h) external causes such as accidents, abuse, or other actions or events beyond our reasonable control. IN THE EVENT THAT THE PRODUCT SERIAL NUMBER IS MISSING OR HAS BEEN ALTERED IN ANY WAY, THIS LIMITED WARRANTY IS VOID AND WITHOUT EFFECT AND PICA PRODUCT DEVELOPMENT, LLC SHALL HAVE NO LIABILITY WHATSOEVER FOR DEFECTS OF SUCH PRODUCT.
WHAT IS THE PERIOD OF COVERAGE?
This limited warranty starts on the date of your purchase and lasts for ONE (1) YEAR, or as long as the product is owned by the original purchase, whichever time period first occurs (the “Warranty Period”). The Warranty Period is not extended if we repair or replace the Product. We may change the availability of this limited warranty at our discretion, but any changes will not be retroactive.
WHAT ARE YOUR REMEDIES UNDER THIS WARRANTY?
With respect to any defective Product during the Warranty Period, we will, in our sole discretion repair or replace such Product (or the defective part) free of charge. We will also pay for shipping and handling fees to return the repaired or replacement Product to you.
HOW DO YOU OBTAIN WARRANTY SERVICE?
To obtain warranty service, you must call 1-800-760-3966 or E-mail our Customer Service Department at [email protected] or provide written notice to PICA Product Development, LLC of any defective part or conditions during the Warranty Period to obtain a Return Merchandise Authorization (“RMA”) number. No warranty service will be provided without an RMA number. You may, at our discretion, be required to return the Product or provide other proof of defect. When required to return the Product, you will be provided with shipping instructions and proof of purchase must accompany shipment. You are responsible for all shipping and handling charges in connection with performance of this limited warranty. For additional RMA process details go to sky-hawk. com/warranty.
LIMITATION OF LIABILITY
THE REMEDIES DESCRIBED ABOVE ARE YOUR SOLE AND EXCLUSIVE REMEDIES AND OUR ENTIRE LIABILITY FOR ANY BREACH OF THIS LIMITED WARRANTY. OUR LIABILITY SHALL UNDER NO CIRCUMSTANCES EXCEED THE ACTUAL AMOUNT PAID BY YOU FOR THE DEFECTIVE PRODUCT, NOR SHALL WE UNDER ANY CIRCUMSTANCES BE LIABLE FOR ANY CONSEQUENTIAL, INCIDENTAL, SPECIAL OR PUNITIVE DAMAGES OR LOSSES TO ANY PERSON OR PROPERTY ARISING OUT OF THE USE OR INABILITY TO USE THE PRODUCT INCLUDING, BUT NOT LIMITED TO, PERSONAL INJURY, WRONGFUL DEATH, PROPERTY DAMAGE, LOSS OF DATA, LOSS OF REVENUE OR PROFITS, BUSINESS INJURY, BUSINESS INTERRUPTION OR ANY OTHER DIRECT OR INDIRECT DAMAGES, EVEN IF PICA PRODUCT DEVELOPMENT, LLC HAS BEEN ADVISED OF THE POSSIBILITY OF SUCH DAMAGES.
SOME STATES DO NOT ALLOW THE EXCLUSION OR LIMITATION OF INCIDENTAL OR CONSEQUENTIAL DAMAGES, SO THE ABOVE LIMITATION OR EXCLUSION MAY NOT APPLY TO YOU.
THE TERMS OF THIS LIMITED WARRANTY WILL APPLY TO THE EXTENT PERMITTED BY APPLICABLE LAW. FOR A FULL DESCRIPTION OF YOUR LEGAL RIGHTS YOU SHOULD REFER TO THE LAWS APPLICABLE IN YOUR JURISDICTION.